
Get Started with the Browser Extension
Get Started
Bitwarden browser extensions integrate password management directly into your favorite browser. Download a Bitwarden browser extension from your browser's marketplace or app store, or from the Bitwarden Downloads page.
The Browser extension is supported for the two most recent versions of:
-
Google Chrome
-
Mozilla Firefox
-
Opera
-
Microsoft Edge
-
Safari
And the most recent versions of:
-
Vivaldi
-
Brave
-
Tor
The Safari browser extension is packaged with the desktop app, available for download from the macOS App Store.
First steps
Let's start your Bitwarden browser extension journey by adding a new login item to your vault:
Add a login
To create a new login item:
Generate a strong password
Now that you have saved a new login, let's improve its security by replacing your password with a stronger one:
-
In your web browser, login to the account with your existing username and password. We're going to be replacing your existing password with a stronger one, but this is a great opportunity to practice autofill!
To autofill, open the Bitwarden browser extension while you're on the website's login page and, in the Vault tab, select the Fill button for the suggested item: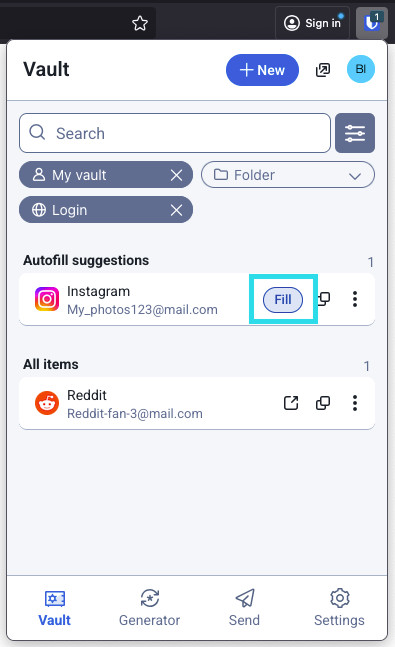
Autofill via browser extension -
Once logged in, find where you can change your password.
-
On the website's change password form, enter your Current Password, which you can copy and paste from Bitwarden using the Copy icon:

Copy a password -
Once your old password is filled in, open the login item in Bitwarden and select Edit.
-
In the Password box, select Generate and tweak your password settings to your liking. You can use to refresh icon until you get a password you like and, once you do, select Use this password. Moving from
Fido1234toX@Ln@x9J@&u@5n##Bcan stop a hacker in their tracks. -
Select Save.
-
Copy your new password and paste it into the New Password and Confirm Password fields back on the website.
Congratulations! Your login is now saved in Bitwarden for secure and easy use!
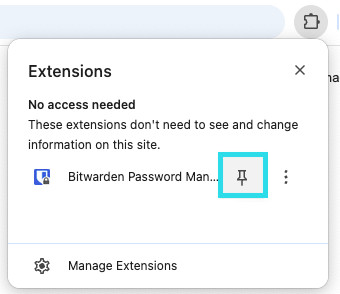
Pin the extension
Pinning the browser extension will ensure that it's easily accessible each time you open your browser. The procedure differs based on which browser you are using:
Select the Extensions icon next to the address bar and select the Pin icon next to Bitwarden:
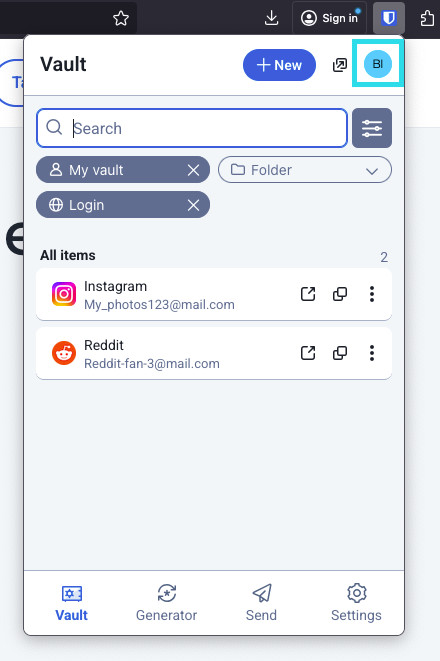
Add a second account
Do you have multiple Bitwarden accounts, perhaps one for personal use and one for work? The browser extension can be logged in to five accounts at once!
To login to an additional account, select the currently logged-in account from the top-right corner of the browser extension:
Once you have opened the account switching menu, select + Add account:
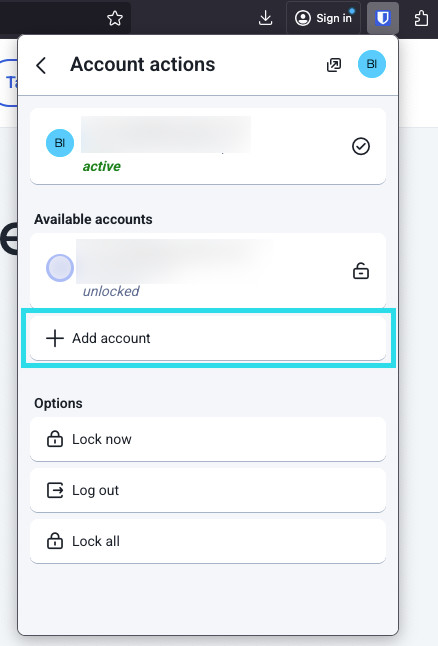
Once you log in to your second account, you can quickly swap between them from the same menu, which will also show the current status of each account's vault (locked or unlocked). If you log out of one of these accounts, it will be removed from this list.
Account switching on the browser extension is not available on Safari at this time.
Next steps
Now that you have mastered the basics let's dig into one more action that you will take regularly, Autofill and Auto-save, and three recommended setup steps; easier vault unlocking, pinning the extension to your browser, and disabling the browser's built-in password manager:
Disable a built-in password manager
Most web browsers will automatically save your passwords by default, but experts generally agree that built-in password managers are more vulnerable than dedicated solutions such as Bitwarden. Learn more about manually disabling a browser's built-in password manager.
Autofill a login
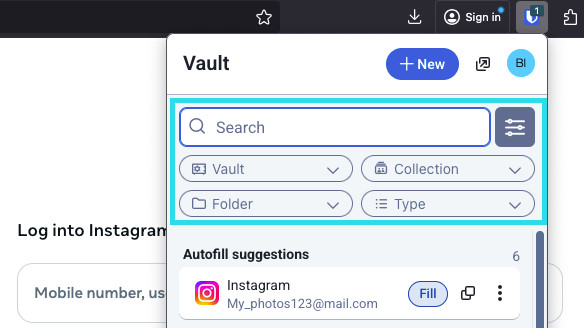
There are lots of ways to autofill credentials with Bitwarden browser extensions! The basic method is to open the Bitwarden browser extension while you're on the website's login page and, in the Vault tab, select the Fill button for the suggested item:
Note that, when you have logins saved for a website you're trying to log in to, Bitwarden browser extensions will overlay a notification bubble reporting the number of logins you have for that website. Those items will appear at the top of your Autofill suggestions. You can filter what will appear in the suggestions and what's displayed in the All items list using the filter dropdown menus, which can be shown or hidden using the button:
There are plenty of other methods and ways of customizing autofill from your browser extension, including context menus and keyboard shortcuts.
Autosave a login
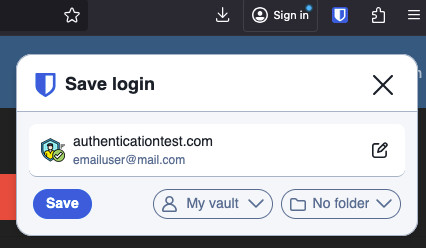
Bitwarden browser extensions offer an array of in-browser notifications that compare your decrypted data with data that you enter into login, registration, and similar web forms.
When you see this banner, select Save to add a new or updated login item with the username, password, and URI. You can also choose to Select folder... for the item if it's new, or Edit the item before saving:
Learn more about Autosave with the browser extension.
Did you know that you can save and autofill passkeys with the Bitwarden browser extension? Learn more about passkeys here.
Unlock with PIN or biometrics
For fast access to your credentials, setup a PIN or biometrics to unlock your vault. To setup a PIN, for example:
-
Open the Settings tab.
-
In the Account security section, check the Unlock with PIN checkbox.
-
Enter the desired PIN code in the input box. PIN codes can be any combination of characters (a-z, 0-9, $, #, etc.)
Optional: The pre-checked option Ask for biometrics on launch will require you to enter your master password instead of a PIN when your browser restarts. If you want to be able to unlock with a PIN when you browser restarts, uncheck this option.
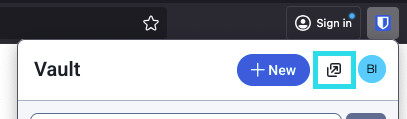
Browser Pop-out
The Bitwarden browser extension has a pop-out feature that will allow you to reposition the client while using your internet browser. To pop-out the browser extension, select the icon shown in the following screenshot:
The browser extension will not observe to your chosen vault timeout settings when popped-out.
Make Bitwarden your default password manager
The Bitwarden browser extension has a built-in setting to disable your browser's default password manager. To use this setting:
-
Navigate to the settings tab in the Bitwarden browser extension and then select Autofill.
-
Click to enable the Make Bitwarden your default password manager.

Make Bitwarden default password manager -
A dialogue will appear on screen, select allow to give Bitwarden permission to make changes to your browser settings.
No comments to display
No comments to display