Password Manager (Bitwarden)
- Get Started with the Browser Extension
- Get Started with the Desktop App
- Get Started with the Mobile Apps
- Get Started with the Web App
- Organizational Sharing
- Sign-Up
Get Started with the Browser Extension
Get Started
Bitwarden browser extensions integrate password management directly into your favorite browser. Download a Bitwarden browser extension from your browser's marketplace or app store, or from the Bitwarden Downloads page.
The Browser extension is supported for the two most recent versions of:
-
Google Chrome
-
Mozilla Firefox
-
Opera
-
Microsoft Edge
-
Safari
And the most recent versions of:
-
Vivaldi
-
Brave
-
Tor
The Safari browser extension is packaged with the desktop app, available for download from the macOS App Store.
First steps
Let's start your Bitwarden browser extension journey by adding a new login item to your vault:
Add a login
To create a new login item:
Generate a strong password
Now that you have saved a new login, let's improve its security by replacing your password with a stronger one:
-
In your web browser, login to the account with your existing username and password. We're going to be replacing your existing password with a stronger one, but this is a great opportunity to practice autofill!
To autofill, open the Bitwarden browser extension while you're on the website's login page and, in the Vault tab, select the Fill button for the suggested item: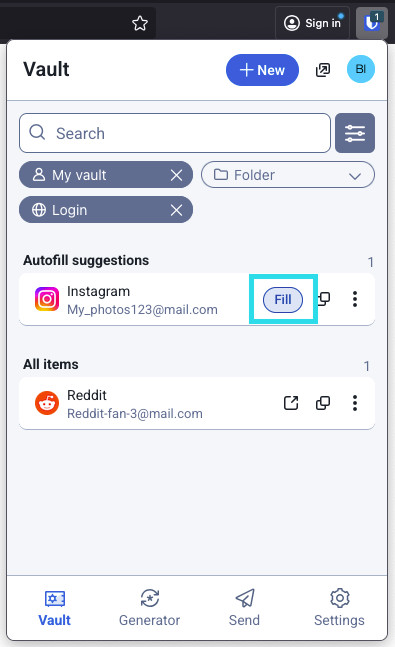
Autofill via browser extension -
Once logged in, find where you can change your password.
-
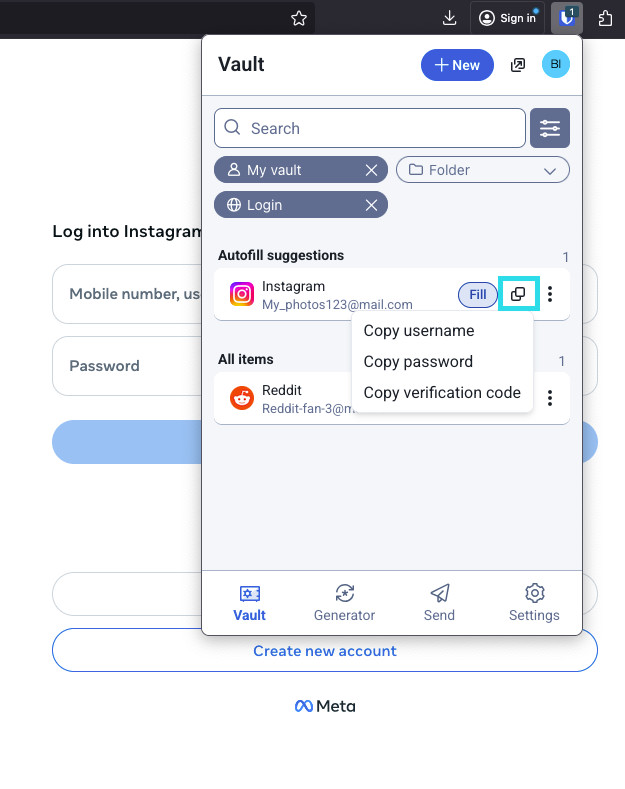
On the website's change password form, enter your Current Password, which you can copy and paste from Bitwarden using the Copy icon:
Copy a password -
Once your old password is filled in, open the login item in Bitwarden and select Edit.
-
In the Password box, select Generate and tweak your password settings to your liking. You can use to refresh icon until you get a password you like and, once you do, select Use this password. Moving from
Fido1234toX@Ln@x9J@&u@5n##Bcan stop a hacker in their tracks. -
Select Save.
-
Copy your new password and paste it into the New Password and Confirm Password fields back on the website.
Congratulations! Your login is now saved in Bitwarden for secure and easy use!
Pin the extension
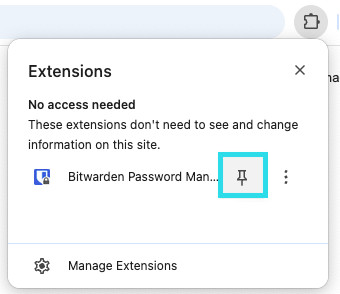
Pinning the browser extension will ensure that it's easily accessible each time you open your browser. The procedure differs based on which browser you are using:
Select the Extensions icon next to the address bar and select the Pin icon next to Bitwarden:
Add a second account
Do you have multiple Bitwarden accounts, perhaps one for personal use and one for work? The browser extension can be logged in to five accounts at once!
To login to an additional account, select the currently logged-in account from the top-right corner of the browser extension:
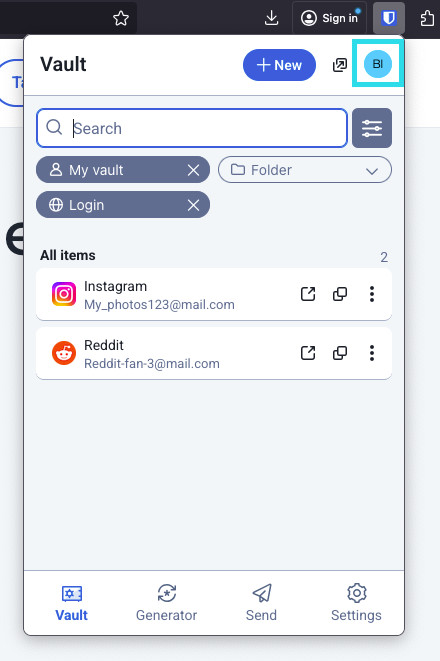
Once you have opened the account switching menu, select + Add account:
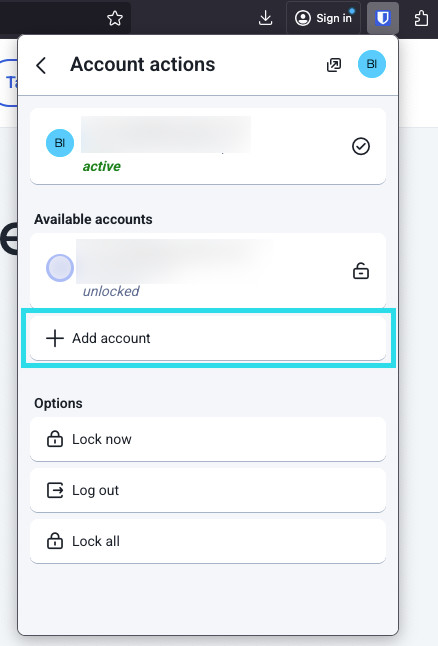
Once you log in to your second account, you can quickly swap between them from the same menu, which will also show the current status of each account's vault (locked or unlocked). If you log out of one of these accounts, it will be removed from this list.
Account switching on the browser extension is not available on Safari at this time.
Next steps
Now that you have mastered the basics let's dig into one more action that you will take regularly, Autofill and Auto-save, and three recommended setup steps; easier vault unlocking, pinning the extension to your browser, and disabling the browser's built-in password manager:
Disable a built-in password manager
Most web browsers will automatically save your passwords by default, but experts generally agree that built-in password managers are more vulnerable than dedicated solutions such as Bitwarden. Learn more about manually disabling a browser's built-in password manager.
Autofill a login
There are lots of ways to autofill credentials with Bitwarden browser extensions! The basic method is to open the Bitwarden browser extension while you're on the website's login page and, in the Vault tab, select the Fill button for the suggested item:
Note that, when you have logins saved for a website you're trying to log in to, Bitwarden browser extensions will overlay a notification bubble reporting the number of logins you have for that website. Those items will appear at the top of your Autofill suggestions. You can filter what will appear in the suggestions and what's displayed in the All items list using the filter dropdown menus, which can be shown or hidden using the button:
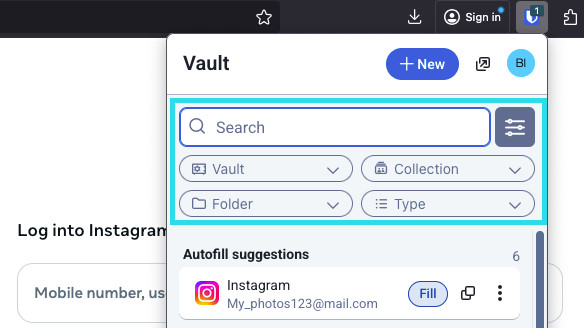
There are plenty of other methods and ways of customizing autofill from your browser extension, including context menus and keyboard shortcuts.
Autosave a login
Bitwarden browser extensions offer an array of in-browser notifications that compare your decrypted data with data that you enter into login, registration, and similar web forms.
When you see this banner, select Save to add a new or updated login item with the username, password, and URI. You can also choose to Select folder... for the item if it's new, or Edit the item before saving:
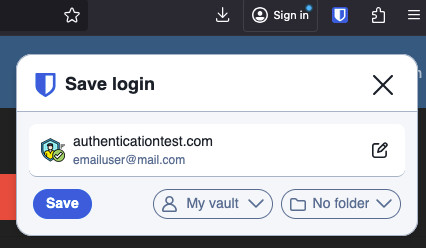
Learn more about Autosave with the browser extension.
Did you know that you can save and autofill passkeys with the Bitwarden browser extension? Learn more about passkeys here.
Unlock with PIN or biometrics
For fast access to your credentials, setup a PIN or biometrics to unlock your vault. To setup a PIN, for example:
-
Open the Settings tab.
-
In the Account security section, check the Unlock with PIN checkbox.
-
Enter the desired PIN code in the input box. PIN codes can be any combination of characters (a-z, 0-9, $, #, etc.)
Optional: The pre-checked option Ask for biometrics on launch will require you to enter your master password instead of a PIN when your browser restarts. If you want to be able to unlock with a PIN when you browser restarts, uncheck this option.
Browser Pop-out
The Bitwarden browser extension has a pop-out feature that will allow you to reposition the client while using your internet browser. To pop-out the browser extension, select the icon shown in the following screenshot:
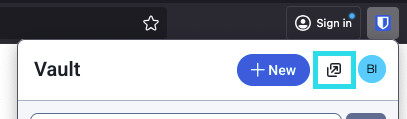
The browser extension will not observe to your chosen vault timeout settings when popped-out.
Make Bitwarden your default password manager
The Bitwarden browser extension has a built-in setting to disable your browser's default password manager. To use this setting:
-
Navigate to the settings tab in the Bitwarden browser extension and then select Autofill.
-
Click to enable the Make Bitwarden your default password manager.
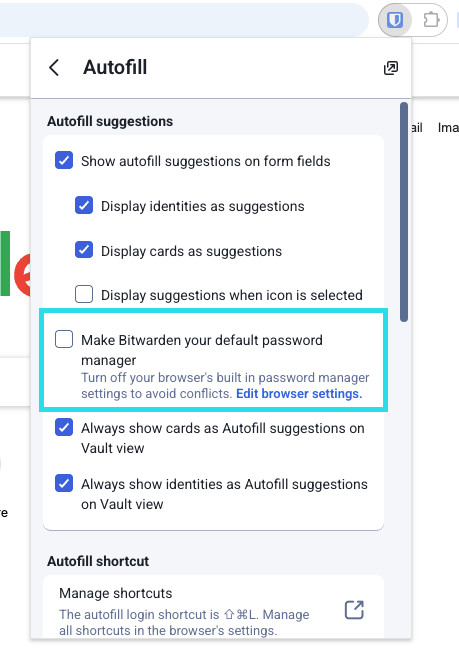
Make Bitwarden default password manager -
A dialogue will appear on screen, select allow to give Bitwarden permission to make changes to your browser settings.
Get Started with the Desktop App
Get Started
The Bitwarden desktop app brings a full vault experience straight out of your browser and into your desktop. The desktop app supports up to five logged-in accounts at a time, making it easy to switch between personal and work accounts at any moment (learn more).
In the My Vault view, you can browse all your items, including items owned by an organization that you are a member of. Use the Vaults dropdown to filter for items in All Vaults, My Vault, and any organization vaults.
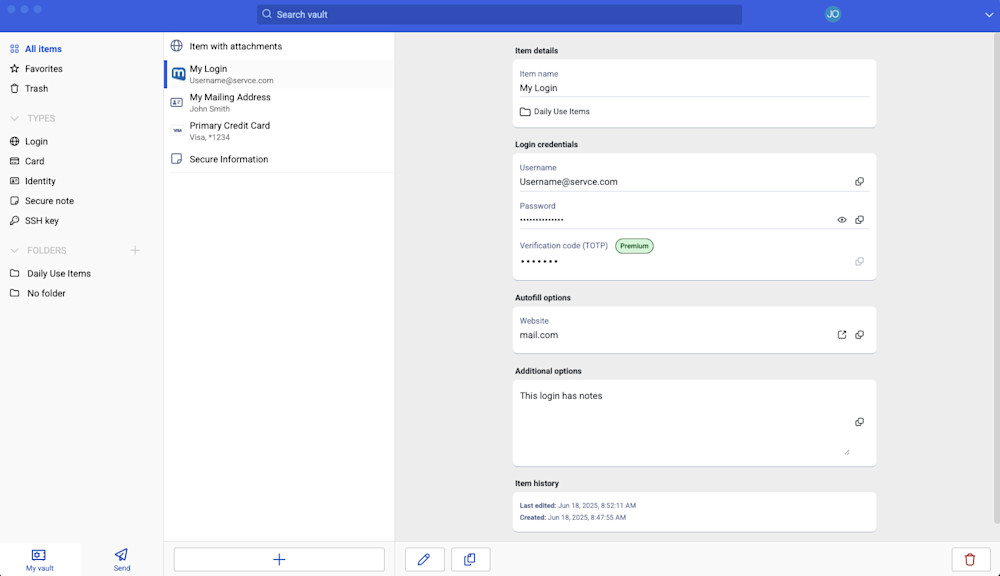
First steps
Let's start your desktop app journey by adding a new login item to your vault and making sure it's secure and easy to find:
Create a folder
-
In the first column of the desktop app, select + Add next to Folders.
-
Give you folder a name (for example
Social Media) and select Save.
Add a login
Now, let's add a login to your new folder. To create a new login item:
-
In the middle column, select + Add. An Add Item panel will be displayed in the third column.
-
Choose which type of item to create (in this case, select Login).
-
Enter the basic information for this login. For now, give the item:
-
A Name to help you easily recognize it (for example,
X.com Account). -
Your Username.
-
Your current Password (we'll replace this with a strong one soon).
-
-
Select the New URI button and enter the URL where you login to the account (for example,
https://x.com/i/flow/login).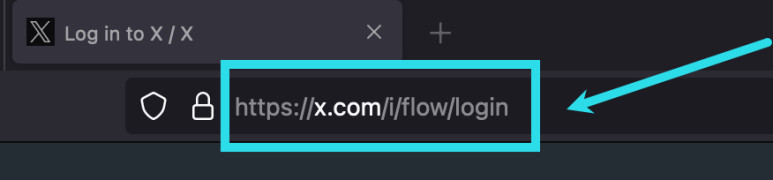
X.com Login URI -
Select a folder from the Folder dropdown. If you are following our example, choose the Social Media folder we just created!
-
Nice work! Select Save to finish.
You can also import data directly to Bitwarden from your desktop app.
Generate a strong password
Now that you have saved a new login, let's improve its security by replacing your password with a strong one:
-
Open a web browser and login to the account with your existing username and password. In that account, find where you can Change your password.
-
On the Change your password form, enter your Current password, which you can copy and paste from Bitwarden using the Copy icon.
-
In Bitwarden, select Edit on your item.
-
In the Password box, select Generate and confirm Yes to overwrite your old password.
This will replace your password with a randomly-generated strong password. Moving fromFido1234toX@Ln@x9J@&u@5n##Bcan stop a would-be hacker in their tracks. -
Select Save.
-
Copy your new password with the Copy icon you used earlier, and paste your new password in the New Password and Confirm New Password fields back in your web browser.
-
Once you are done, select Save in the web browser.
Congratulations! Your login is now saved in Bitwarden for secure and easy use!
Add a second account
Do you have multiple Bitwarden accounts, perhaps one for personal use and one for work? The desktop app can be logged in to five accounts at once!
To login to an additional account, select the currently logged-in account from the top-right of the desktop app and select + Add Account:
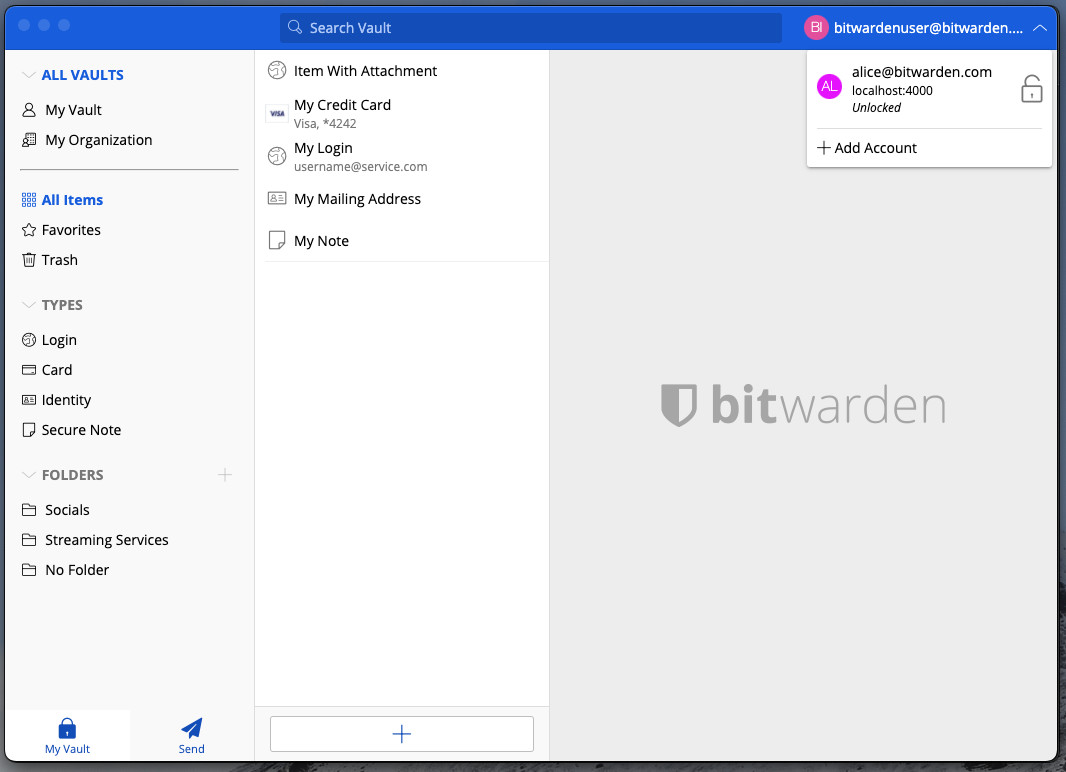
Once you log in to your second account, you can quickly swap between them from the same menu, which will also show the current status of each account's vault (locked or unlocked). If you log out of one of these accounts, it will be removed from this list.
Next steps
Now that you have mastered the basics, you can customize your desktop app to work exactly the way you want it to:
Windows
Set your preferences
To set your preferences, select File → Settings from the menu bar. You'll notice three sections; Security, Preferences, and App Settings.
Security and Preferences apply to the active account and should be set separately for each account, but App Settings apply to all accounts.
Unlock with biometrics
One of the most popular desktop app settings is unlock with biometrics, which allows for seamless access using Windows Hello with PIN, facial recognition, or other hardware that meets Windows Hello biometric requirements. To setup biometric unlock:
Windows users may need to install the Microsoft Visual C++ Redistributable before Windows Hello can be turned on in desktop preferences.
-
Enable Windows Hello on your computer.
-
In the Security section, an Unlock with Windows Hello option will appear if Windows Hello is supported and enabled on your computer:
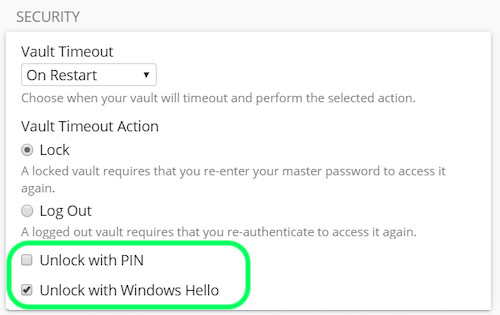
Windows unlock options Check the Unlock with Windows Hello option to proceed. Your computer will prompt you to input your biometric.
-
Once enabled, use the Unlock with Windows Hello button on the unlock screen to unlock your vault.
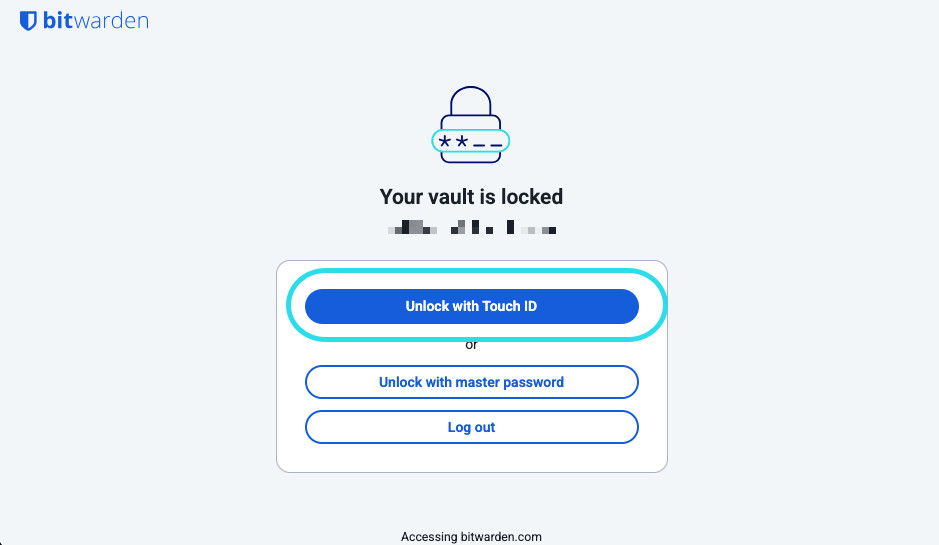
Security settings are set per-account, so if you want to enable biometric unlock for another account you'll need to go through these steps again!
Start Bitwarden automatically
Another helpful feature is to always start Bitwarden when you boot up your computer. To enable this, navigate to the App Settings section and check the Start automatically on login checkbox.
Unlike biometrics, this setting applies globally to all logged-in accounts!
MacOS
Set your preferences
To set your preferences, select Bitwarden → Settings from the menu bar. You'll notice three sections, Security, Preferences, and App Settings.
Security and Preferences apply to the active account and should be set separately for each account, but App Settings apply to all accounts.
Unlock with biometrics
One of the most popular desktop app settings is unlock with biometrics, which allows seamless access to your desktop app using Touch ID technology. To setup biometric unlock:
-
Enable Touch ID on your computer. See Apple's Touch ID Documentation for help.
-
In the Security section, an Unlock with Touch ID option will appear if Touch ID is supported and enabled on your computer:
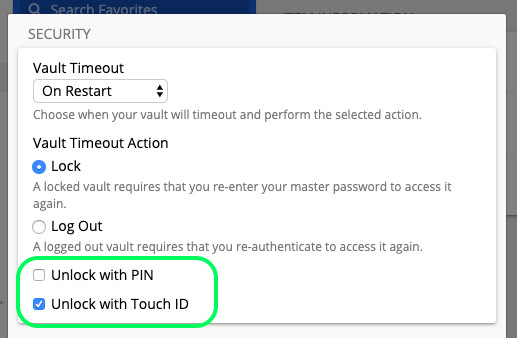
macOS unlock options Check the Unlock with Touch ID checkbox to proceed. Your computer will prompt you to input your fingerprint to confirm.
-
Once enabled, use the Unlock with Touch ID button on the Unlock screen to unlock your vault.
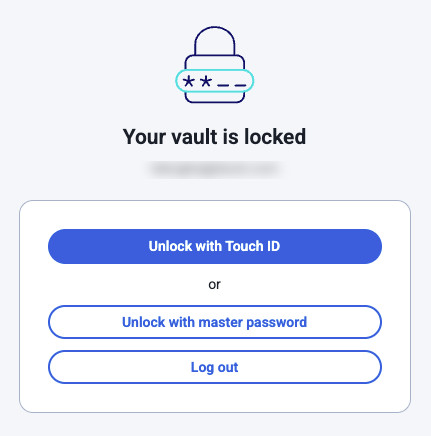
Security settings are set per-account, so if you want to enable biometric unlock for another account you'll need to go through these steps again!
Start Bitwarden Automatically
Another helpful feature is to always start Bitwarden when you boot up your computer. To enable this, navigate to the App Settings section and check the Start automatically on login checkbox.
Unlike biometrics, this setting applies globally to all logged-in accounts!
Get Started with the Mobile Apps
Get Started
Bitwarden mobile apps let you take your password manager on the go. Download Bitwarden from the iOS App Store or Google Play Store, or by navigating to get.bitwarden.com on any device.
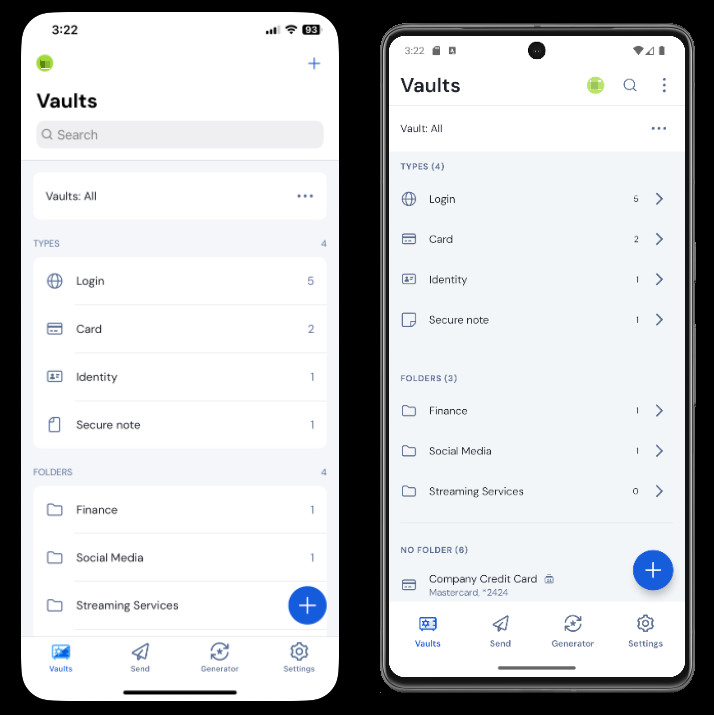
First steps
Let's start your Bitwarden mobile journey by adding a new login item to your vault and make sure it's secure and easy to find:
Create a folder
Folders are a great way to make sure you can always find vault items when you need to use them. To create a folder:
-
Select the Settings tab.
-
Select Vault and, in the settings list, tap Folders:
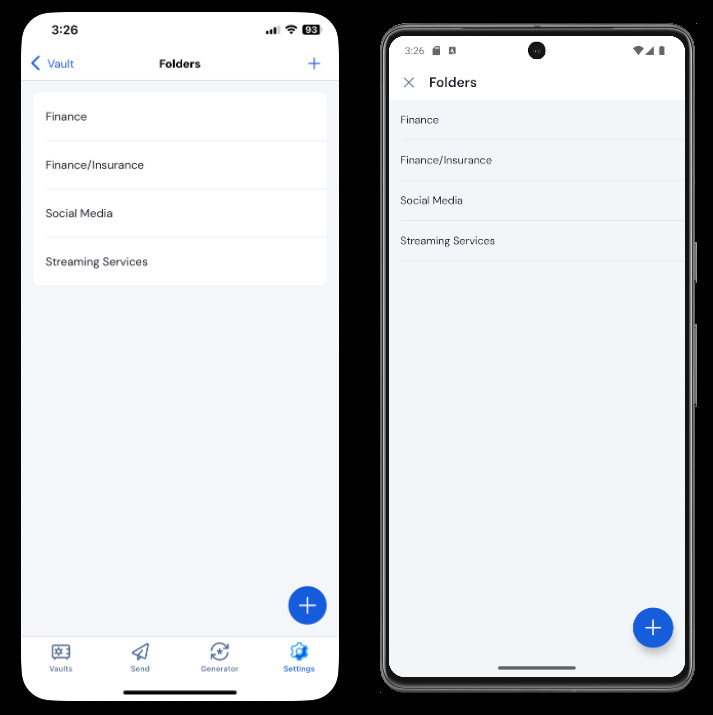
Folders on mobile -
Select the + Add icon.
-
Give your folder a name, (for example,
Social Media), and select Save.
Add a login
Now, let's add a login to your new folder. To create a new login item:
-
Navigate to the My Vault tab and select the + Add icon.
-
Choose which type of item to create (in this case, select Login):
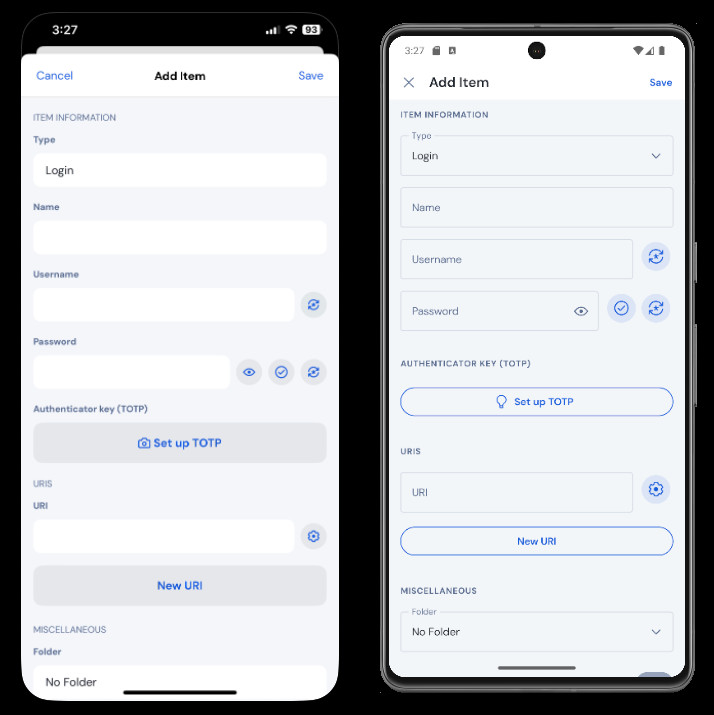
Add a login on mobile -
Enter the basic information for this login. For now, give the item:
-
A Name to help you easily recognize it (for example,
Instagram Account). -
Your Username.
-
Your current Password (we'll replace this with a strong one soon).
-
-
Select the New URI button and enter the URL where you log in to the account (for example,
https://www.instagram.com/accounts/login/) -
Select a folder from the Folder dropdown. If you are following our example, choose the Social Media folder you just created.
-
Nice work! Select Save to continue.
Generate a strong password
Now that you have saved a new login, let's improve its security by replacing your password with a stronger one:
-
Open a web browser or the mobile app for your account and login with your existing username and password. Once you are logged in, find the Change your password page.
-
On the Change your password page, enter your current password. You can copy and paste this from Bitwarden!
-
Back in Bitwarden, select the login item and tap Edit on iOS or the on Android.
-
In the Password box, select Generate and confirm Yes to overwrite your old password.
This will replace your password with a randomly-generated strong password. Moving fromFido1234toX@Ln@x9J@&u@5n##Bcan stop a hacker. -
Select Save.
-
Copy your new password and paste it into the New Password and Confirm Password fields back in the other app.
Congratulations! Your login is now saved in Bitwarden for secure and easy use!
Add a second account
Do you have multiple Bitwarden accounts, like one for personal use and one for work? The mobile app can be logged in to five accounts at once!
To login to a second account, select the currently logged-in account from the top menu bar of the app and select + Add Account:
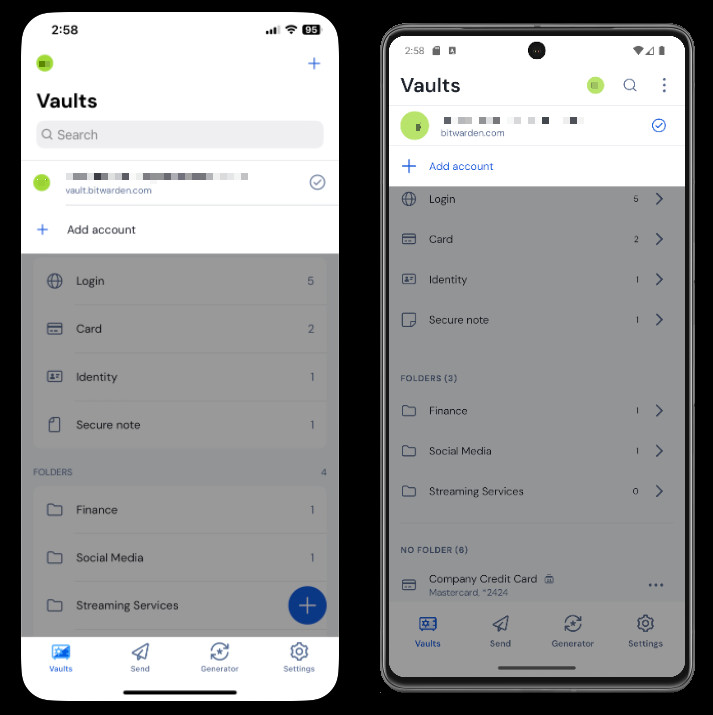
Once you log in to your second account, you can quickly switch between them from the same menu, which will also show the current status of each account's vault (locked or unlocked). If you log out of one of these accounts, it will be removed from this list.
Next steps
Now that you have mastered the basics, let's dig into some of the more powerful features of Bitwarden mobile apps:
iOS
Setup AutoFill
Setup AutoFill to automatically enter logins from your iOS device to a web browser (like Safari) or other app.
-
On the iOS home screen, tap the Settings app.
-
From the Settings menu, tap General and then AutoFill & Passwords.
-
Tap the AutoFill Passwords and Passkeys toggle. Green indicates that AutoFill is active.
-
In the AutoFill From: list, select the Bitwarden toggle. Green indicates that AutoFill is active.
When you create new logins, make sure you enter a website in the URI field to surface them for AutoFill. For more information, see Autofill Logins on iOS.
Launch from mobile apps
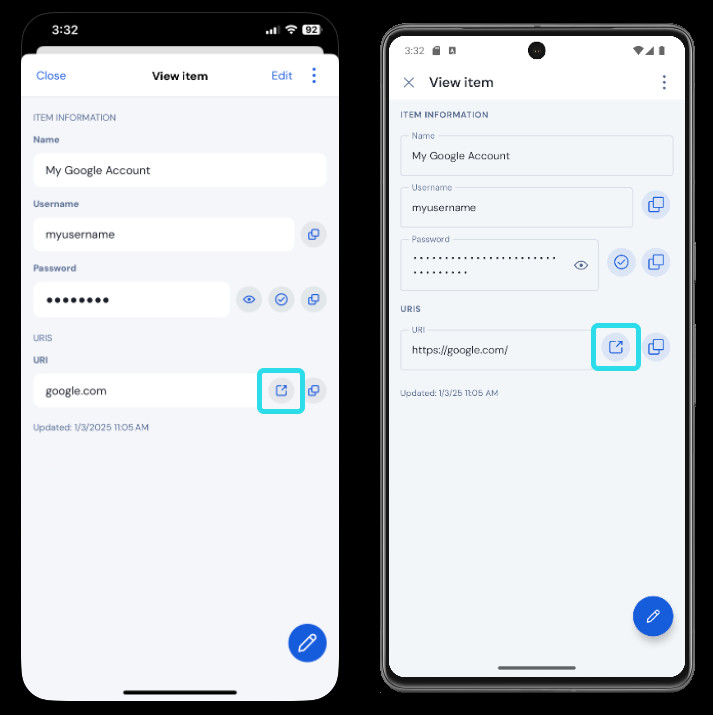
You can launch a website directly from Bitwarden by selecting the Launch button in any vault item with a valid URI. If you're unfamiliar with using URIs, see Using URIs.
Unlock with biometrics
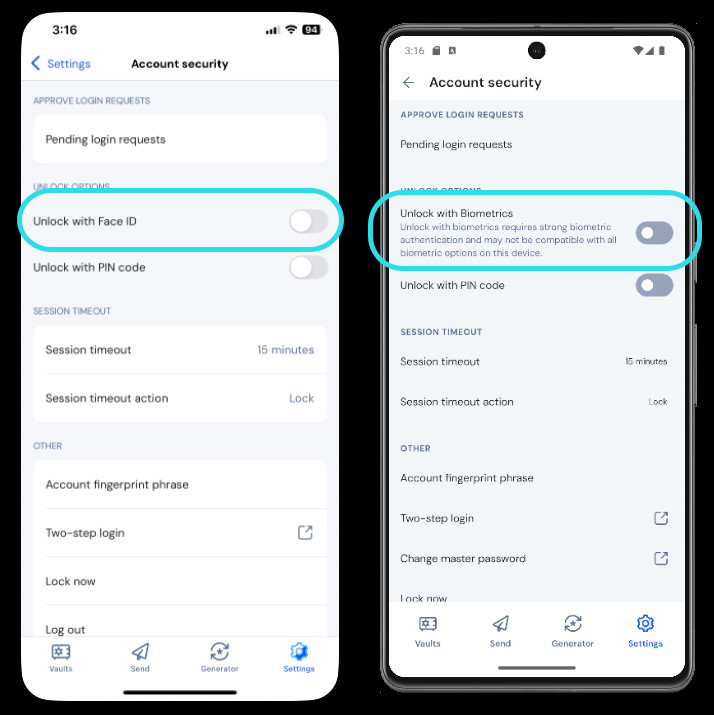
Unlocking Bitwarden with biometrics allows for seamless access to your vault. If you haven't setup Touch ID or Face ID on your iOS device, you'll need to do that first from the iOS Settings app.
-
In your Bitwarden iOS app, tap the Settings tab located at the bottom of your screen.
-
Tap Account security:
Biometric unlock on mobile -
Depending on what your device has available, tap:
-
Unlock with Touch ID
-
Unlock with Face ID
-
-
You will be asked to verify with your fingerprint or face depending on your selection. The toggle will fill to indicate that an option is active.
Once enabled, you will be able to open Bitwarden or AutoFill logins using just your biometric method of choice.
Login using AutoFill
Once you've setup Auto-fill and biometrics, logging into an app or website using Bitwarden is simple.
-
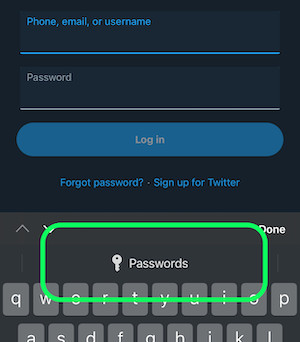
Tap the email/username or password input box in the app or website.
-
Above your keyboard, tap Passwords.
Tap Passwords in iOS -
You will be prompted for your Face ID or Touch ID. If you aren't using biometrics, enter your master password.
-
If you have connected a login to this website or app using the URI field, that login will appear in this window. If you haven't, tap Search to find it. Tap the login to automatically enter your email/username and password into the boxes, and sign in.
Android
Setup autofill
Setup auto-fill to automatically enter logins from your Android device to a web browser (such as Chrome) or other app. To enable autofill:
-
Open your Bitwarden Android app and tap the Settings tab.
-
Tap the Autofill option:
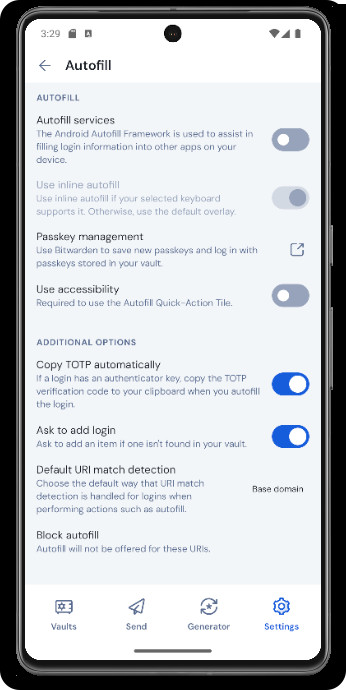
Android autofill options -
Toggle the Autofill Services option. You'll be automatically redirected to an Android Settings screen.
-
From the Autofill Services list, tap Bitwarden.
You'll be prompted to confirm you trust Bitwarden. Tapping OK will let Bitwarden read content on the screen to know when to offer autofill. For more information, see Autofill logins on Android.
Launch from mobile apps
You can launch a website directly from Bitwarden by selecting the Launch button in any vault item with a valid URI. If you are unfamiliar with using URIs, see Using URIs.
Unlock with biometrics
Unlocking Bitwarden with biometrics allows for seamless access to your vault. If you haven't setup fingerprint unlock or face unlock on your Android device, you will need to do that first from the Android Settings app.
-
In Bitwarden, tap the Settings tab located at the bottom of your screen.
-
Tap Account security.
-
Tap Unlock with biometrics:
Biometric unlock on mobile -
You will be asked to verify with your fingerprint or face depending on your selection.
Once enabled, you will be able to open Bitwarden or autofill logins using just your biometric method of choice.
Login using autofill
Once you have setup autofill and biometrics, logging into an app or website using Bitwarden is simple.
-
Tap the email/username or password input box in the app or website.
-
Depending on which auto-fill option your device uses, tap the available overlay:
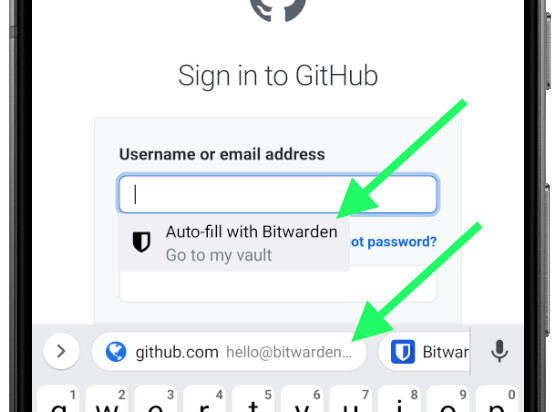
Android Auto-fill varieties -
You will be prompted for your face authentication or fingerprint. If you aren't using
biometrics, enter your master password. -
If you have connected a login to this website or app using the
URI field, that login will appear in this window. If you haven't, tap Search to find it.Tap the login to automatically enter your email/username and password into the boxes, and sign in.
Get Started with the Web App
Get Started
The Bitwarden web app provides the richest Bitwarden experience for personal users and organizations. Many important functions such as setting up two-step login or administering an organization must be done from the web app.
The web app is accessible from any modern web browser at vault.bitwarden.com and vault.bitwarden.eu. If you are self-hosting Bitwarden, access to the web app will be located at your configured domain, for example https://vault.revivenovi.org.
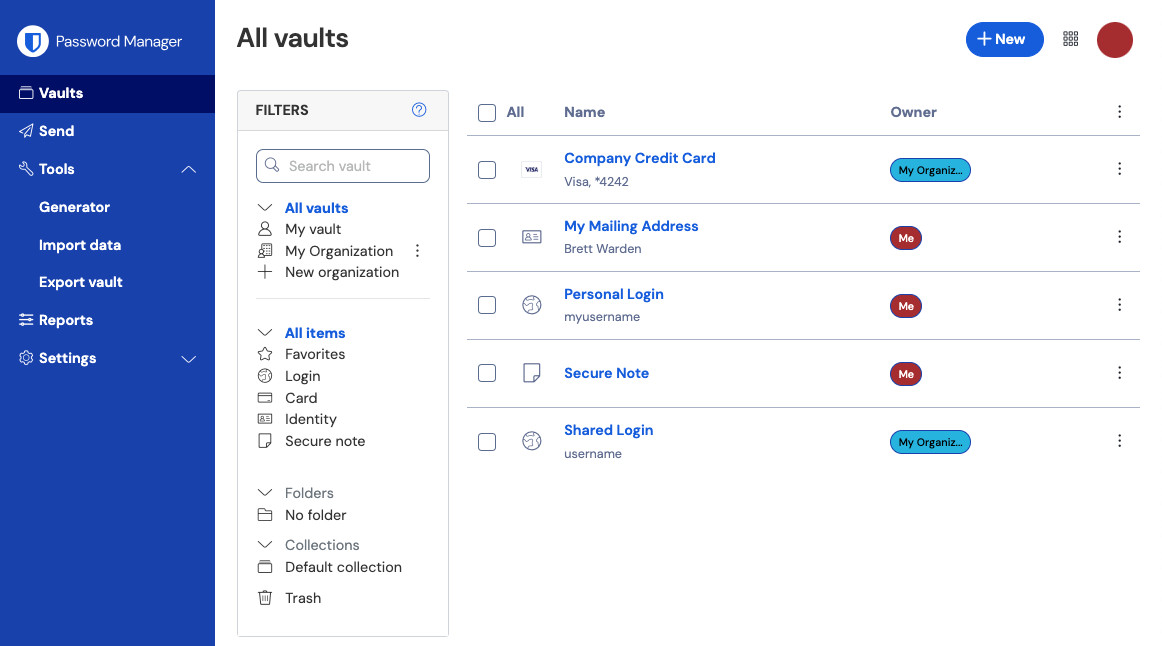
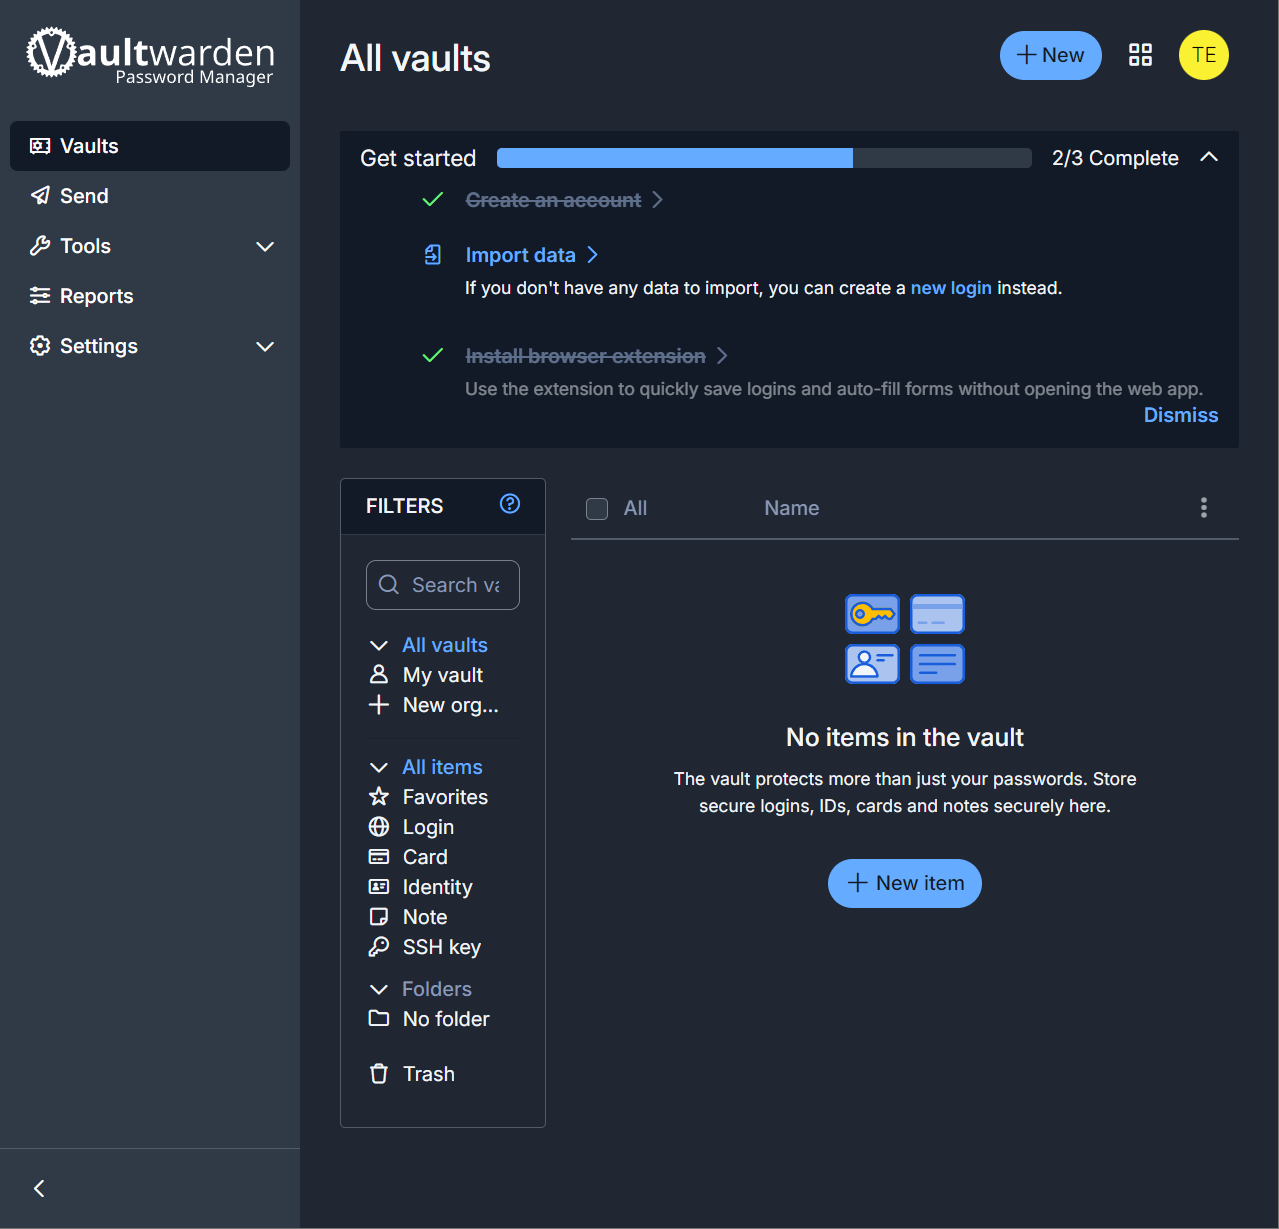
When you first log in to your web app, you'll land on the All vaults view. This space will list all vault items, including logins, cards, identities, and secure notes.
First steps
In the previous screenshot, the All vaults view is displaying All Items in all vaults. Members of organizations will have other vaults listed here. Using the Filters column, you can organize your vault into Favorites and Folders.
Let's start by setting up a new folder and adding a new login to it:
Create a folder
To create a folder:
-
Select the + New button and choose Folder from the dropdown:
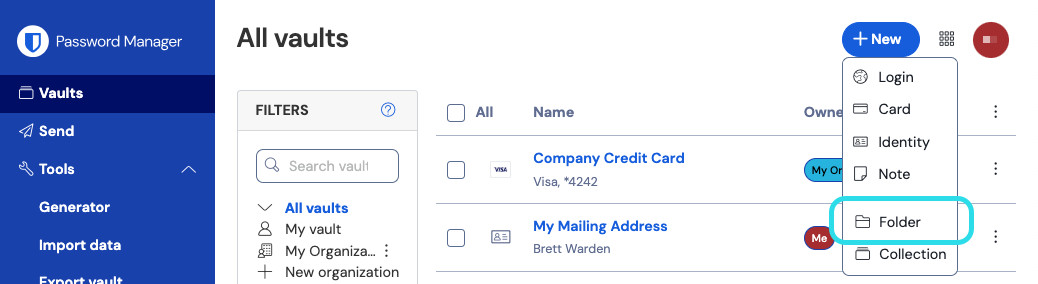
New folder -
Enter a name (for example,
Important Logins) for your folder and select Save.For a cleaner vault, you can nest folders inside other folders
Add a login
To add a new login item:
-
Select the + New button and choose Login from the dropdown.
-
Enter an Item name. Names will help you easily identify items in your vault, so give this item a recognizable one (for example,
My Gmail Account). -
From the Folder dropdown, select the name of the folder you want to add this item to (for example, the
Important Loginsfolder we created earlier). -
Enter your Username and Password. For now, enter your existing password. We will help you replace it with a stronger password later.
-
In the Website (URI) field, enter the URL of the website (for example,
https://accounts.google.com). If you don't know what URL to use, navigate to the website's login screen and copy it from your address bar.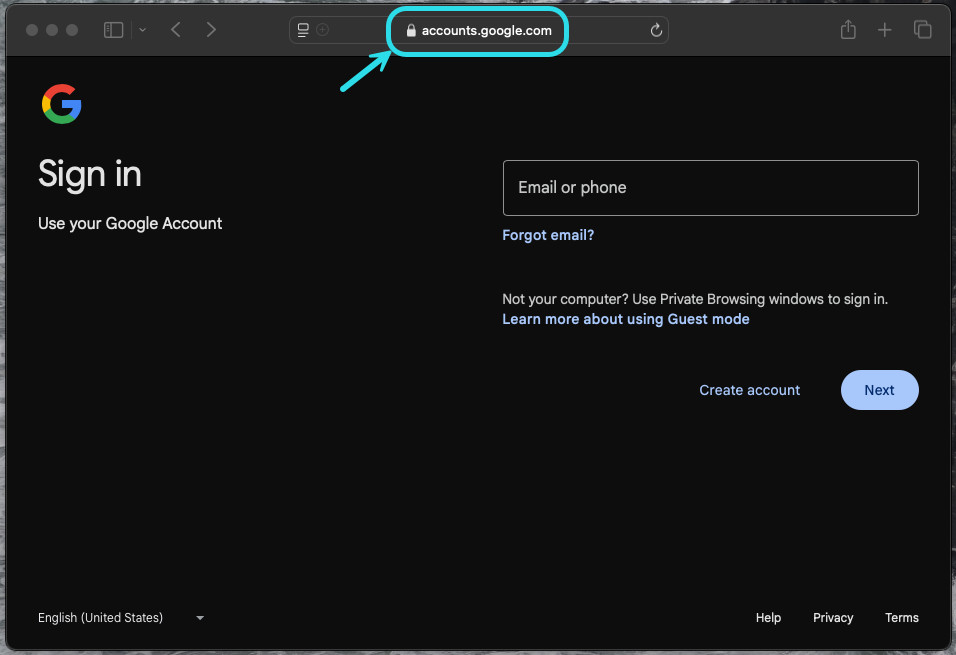
Locating URLs -
Select the Favorite icon to add this item to your favorites. The icon will fill-in when it is a favorite.
-
Nice work! Select the Save button to finish adding this item.
Generate a strong password
Now that a new login is saved in your vault, improve its security by replacing the existing password with a stronger one:
-
In your vault, select the item you want to secure to open it and select the Edit button.
-
In a new tab or window, open the corresponding website and login to your account.
If you entered something in the URI 1 field, click the Launch icon to open it directly from your vault.
Don't worry about overwriting your existing password! If something goes wrong, Bitwarden stores a Password history
of the last five passwords for every login.
-
Return to the other website and paste your strong password in the New Password and Confirm new password fields.
-
Once you Save the password change, you are finished!
Import your data
Good news! You don't need to repeat this process for every login if you have usernames and passwords saved in a web browser or other password manager. Use one of our specialized import guides for help transferring your data from:
Secure your vault
Now that your vault is full of data, let's take some steps to protect it by setting up two-step login. Two-step login requires you to verify your identity when logging in using an additional token, usually retrieved from a different device.
There are many available methods for two-step login, but the recommended method for a free Bitwarden account is using a mobile device authenticator app such as Bitwarden Authenticator:
-
Download Bitwarden Authenticator on your mobile device.
-
In the Bitwarden web app, select Settings → Security → Two-step login from the navigation:
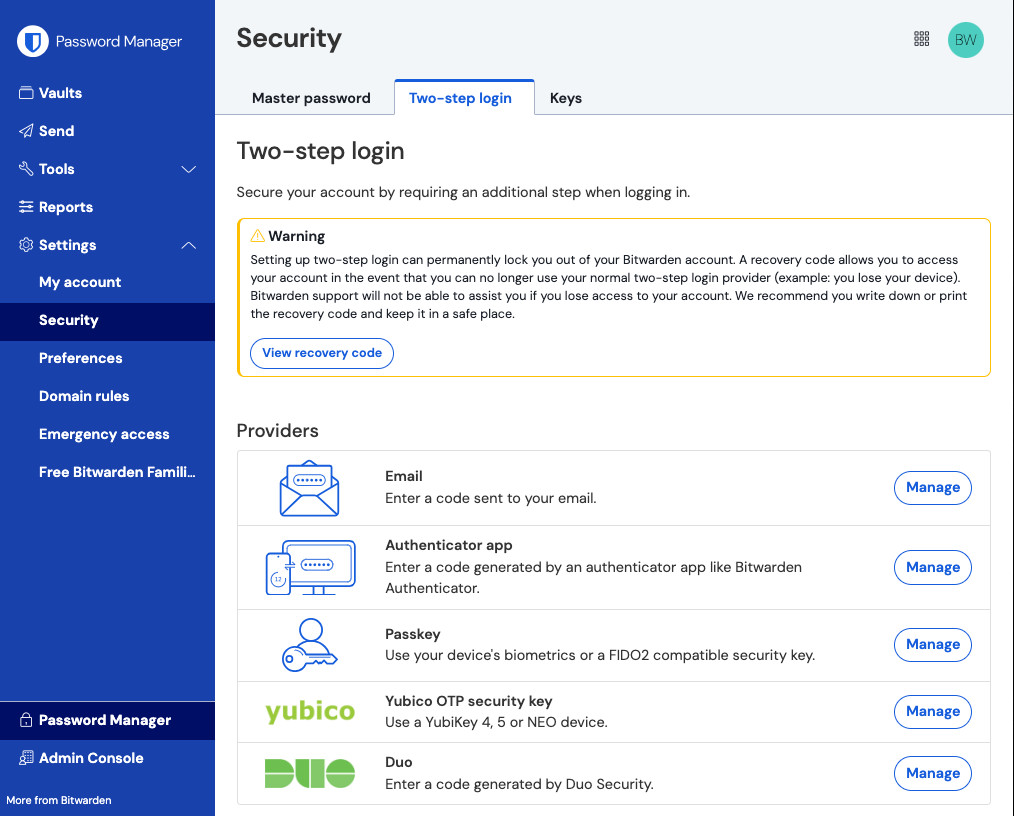
Two-step login -
Locate the Authenticator App option and select Manage:
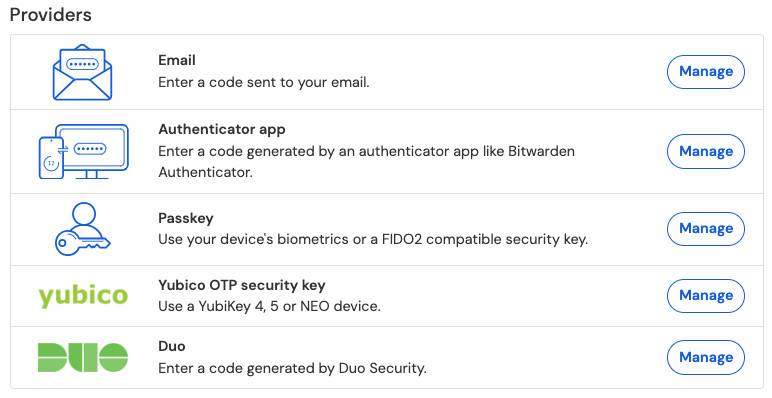
Two-step login providers You'll be prompted to enter your master password to continue.
-
On your mobile device, open Bitwarden Authenticator and tap the button.
-
Scan the QR code located in your web app using Bitwarden Authenticator. Once scanned, Bitwarden Authenticator will display a six-digit verification code.
-
Enter the six-digit verification code into the dialog box in your web app, and select the Enable button.
-
Select the Close button to return to the Two-step login screen, and select the View Recovery Code button.
Your recovery code can be used in the event that you lose your mobile device. This is a critical step to ensure you don't ever get locked out of your vault, so don't skip it!
-
Enter your master password and select the Continue button to get your recovery code.
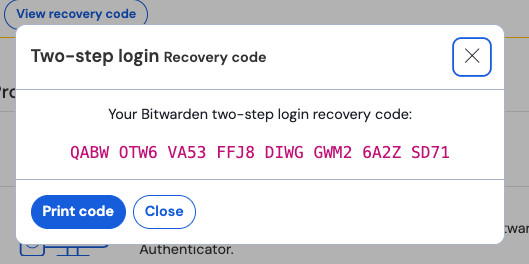
Example recovery code
Save your recovery code in the way that makes the most sense for you. Believe it or not, printing your recovery code and keeping it somewhere safe is one of the best ways to make sure that the code is not vulnerable to theft or inadvertent deletion.
Organizational Sharing
Share Items
Using Bitwarden, sharing an item means two things:
-
Adding the item to an organization. This transfers ownership of the item to the organization you're sharing it with.
-
Adding the item to one or more collections. The Access settings set on those collections determine who will have access to it.
There are lots of different methods for sharing items using Bitwarden. In this article, we'll walk through those methods. Whichever method works best for your workflow, remember that you'll need to be a member of an organization in order to share.
Share new items
Whether you're Adding items to your organization or Importing items to your organization, you can specify who they should be shared with right from the start. You can add or import items to any collection that you have the right permissions for:
-
On the Vault view of any Bitwarden app, select the + New button and select the desired item type
Organization owners, admins, and some custom users can also take this step directly from the Admin Console to skip some of the steps in this process.
Using the Owner dropdown, choose the organization you want this item to be owned by. -
Using the Collections dropdown, choose the collection(s) to share this item with. The Access settings set on those collections determine who will have access to it.
-
Fill in the rest of the relevant information for the item and select Save to complete sharing.
Reminder: Sharing an item involves giving ownership of it to the organization. Permissions for a collection should be well managed by the administrative team because members with the right level of permission have the ability to alter or delete a shared item. You can tell that an item is shared by the badge next to its name: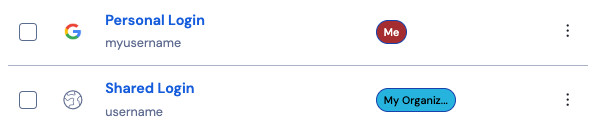
Share existing items
You might find that an item currently owned by you needs to be shared with other members of your organization. Items can be shared with any collection that you have the right permissions for, from any Bitwarden app
Web App
The most universal method for sharing existing items using the web app can be used to share items that will be brand new to your organization, or to simply add more collections to the list it's shared with:
-
In the Vaults view, select the item(s) to share using the checkbox(es).
Organization owners, admins, and some custom users can also take this step directly from the Admin Console to skip some of the steps in this process.
-
Using the options menu, select the Assign to collections option:
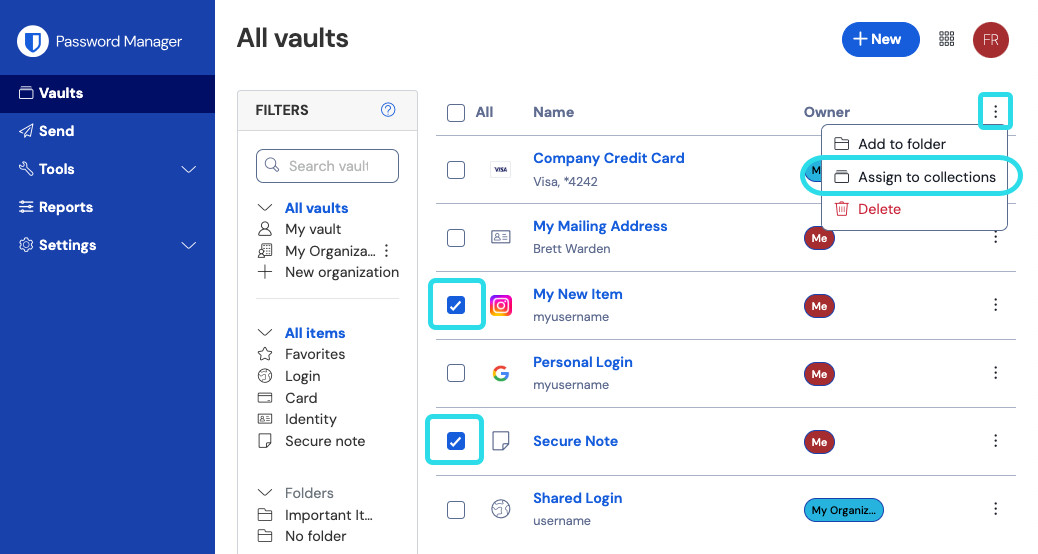
Assign to collections -
On the Assign to collections pop-up:
-
Use the Move to organization dropdown to choose the organization you want this item to be owned by.
-
Use the Select collections to assign dropdown to choose the collection(s) to share this item with. The Access settings set on those collections determine who will have access to it.
-
-
Select Assign to complete sharing.
More methods for sharing
The previously described method is the most universal and simplified, however there are a few other methods for sharing you may have access to:
-
Share from the Admin Console: As mentioned previously, organization
owners, admins, and some custom users can streamline sharing by doing so directly from the Admin Console: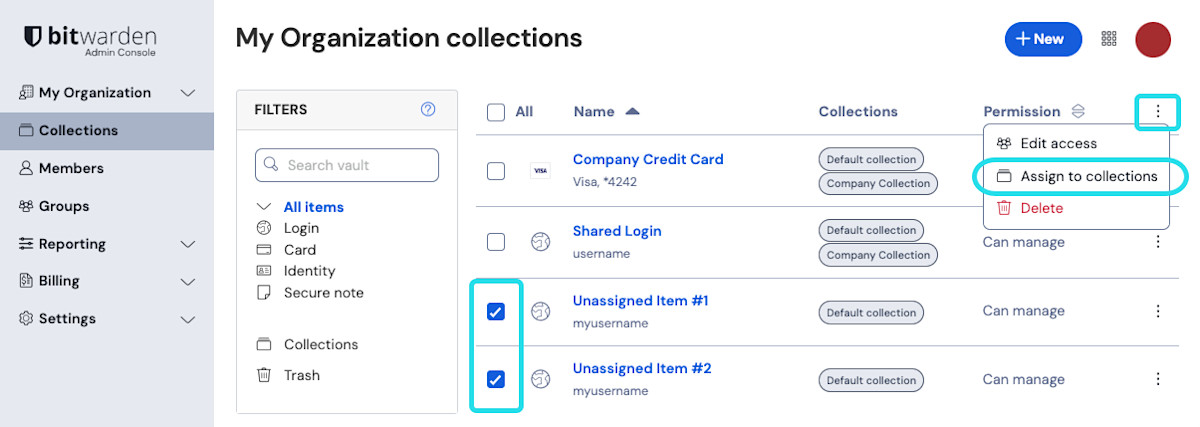
Assign to collections in bulk -
Edit an item directly: If you need to make changes to an individual item prior to sharing it, open the item and, in the Edit view, use the Owner and Collections dropdowns to choose who to share it with while you're making the necessary changes:
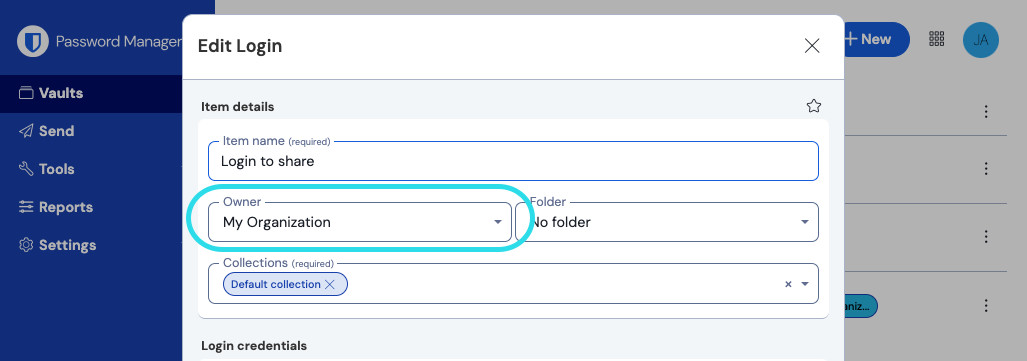
Change item ownership
Browser Extension
To share an existing item from the browser extension:
-
In the Vault view, use the options menu for the item you want to share and select Assign to collections:
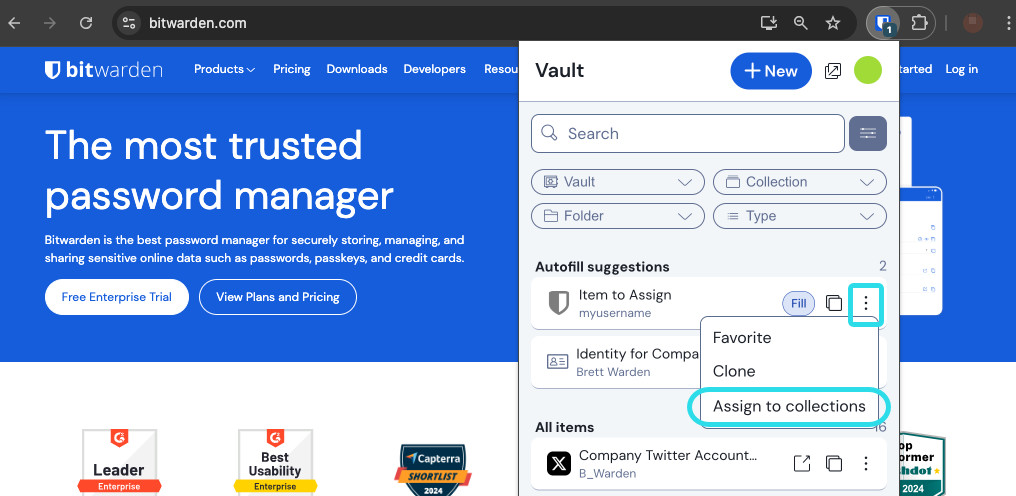
Browser extension assign to collections -
On the Assign to collections pop-up:
-
Use the Move to organization dropdown to choose the organization you want this item to be owned by.
-
Use the Select collections to assign dropdown to choose the collection(s) to share this item with. The Access settings set on those collections determine who will have access to it.
-
-
Select Assign to complete sharing.
More methods for sharing
There are a few other ways to share an item:
-
Edit an item directly: If you need to make changes to an individual item prior to sharing it, open the item and, in the Edit view, use the Owner and Collections dropdowns to choose who to share it with while you're making the necessary changes:
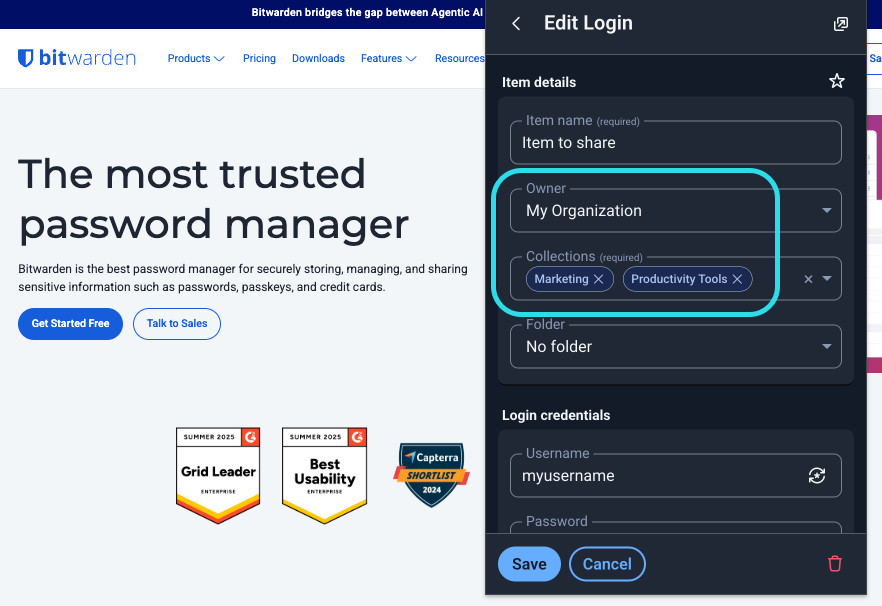
Share while editing on browser
Desktop
To share an existing item from the desktop app:
-
In the Vault view, right-click the item you want to share and select Assign to collections from the menu:
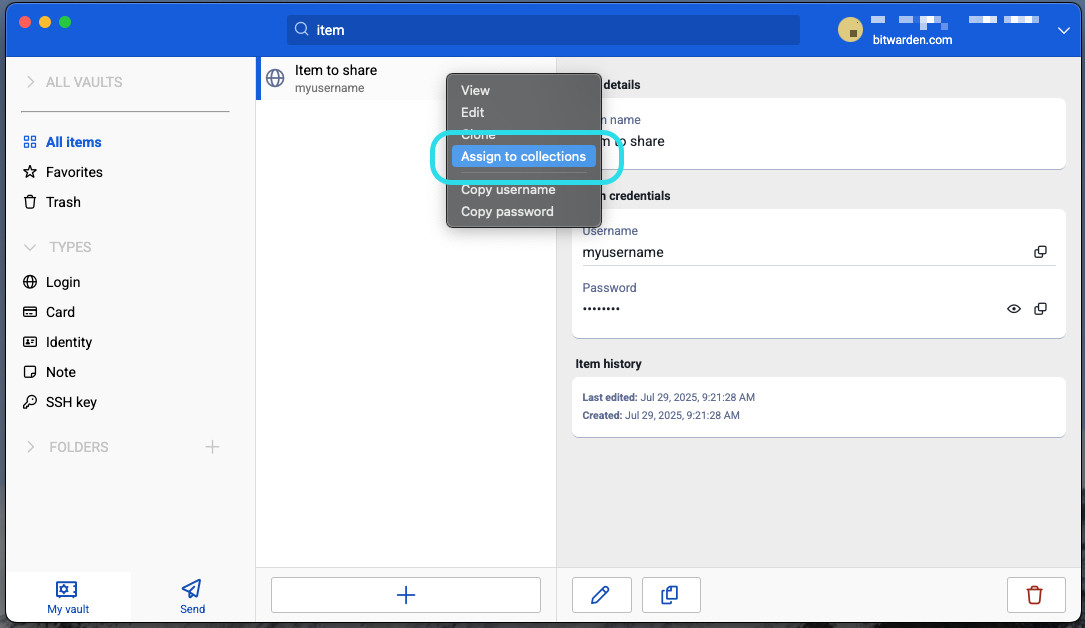
Share from desktop -
On the Assign to collections pop-up:
-
Use the Move to organization dropdown to choose the organization you want this item to be owned by.
-
Use the Select collections to assign dropdown to choose the collection(s) to share this item with. The Access settings set on those collections determine who will have access to it.
-
-
Select Assign to complete sharing.
More methods for sharing
There are a few other ways to share an item:
-
Edit an item directly: If you need to make changes to an individual item prior to sharing it, open the item and, in the Edit view, use the Owner and Collections dropdowns to choose who to share it with while you're making the necessary changes:
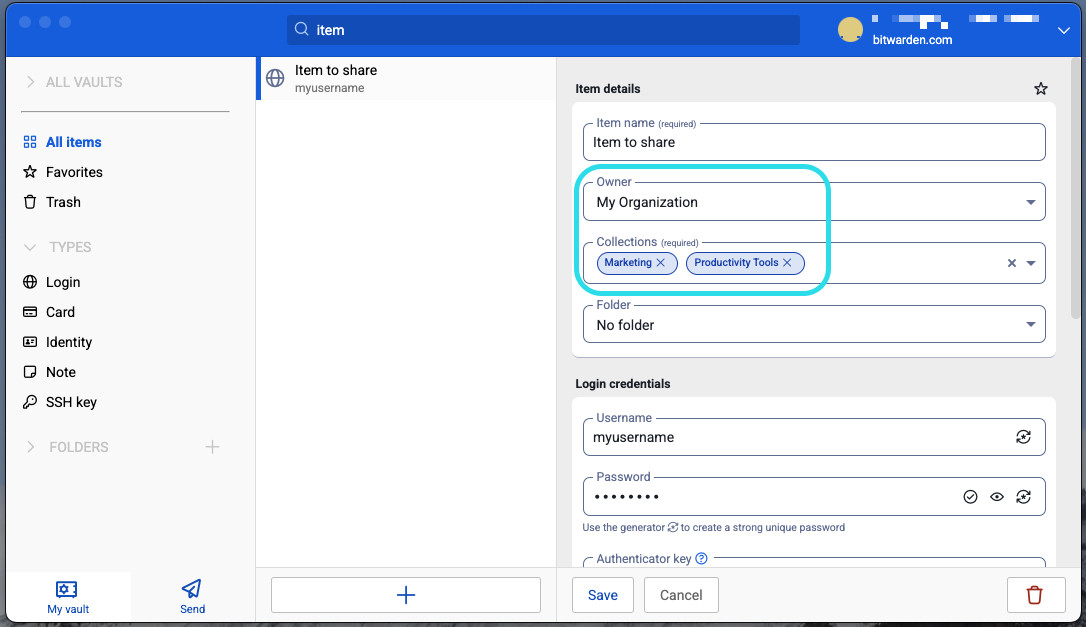
Share while editing on desktop
After items are shared
Reminder: Sharing an item involves giving ownership of it to the organization. Permissions for a collection should be well managed by the administrative team because members with the right level of permission have the ability to alter or delete a shared item. You can tell that an item is shared by the badge next to its name:
Reclaimed shared item ownership
Users with the Manage collection permission for the collection(s) an item is stored in can choose to stop sharing an item with an organization:
-
Clone the item by using the options menu for the item and selecting Clone.
-
On the New item panel, use the Owner dropdown to select your account email. This will ensure the item is cloned into a non-shared context.
-
Save the cloned item.
-
Delete the original item by using the options menu for the item and selecting Delete.
Note that in some cases moving the item to a collection with higher access control restrictions, or to a collection that only you have access to, can be more effective than outright removing it from the organization.
Sign-Up
Step 1
Go to the webvault site to sign-up for an account (Note: you must already have an account created with the authentication server).
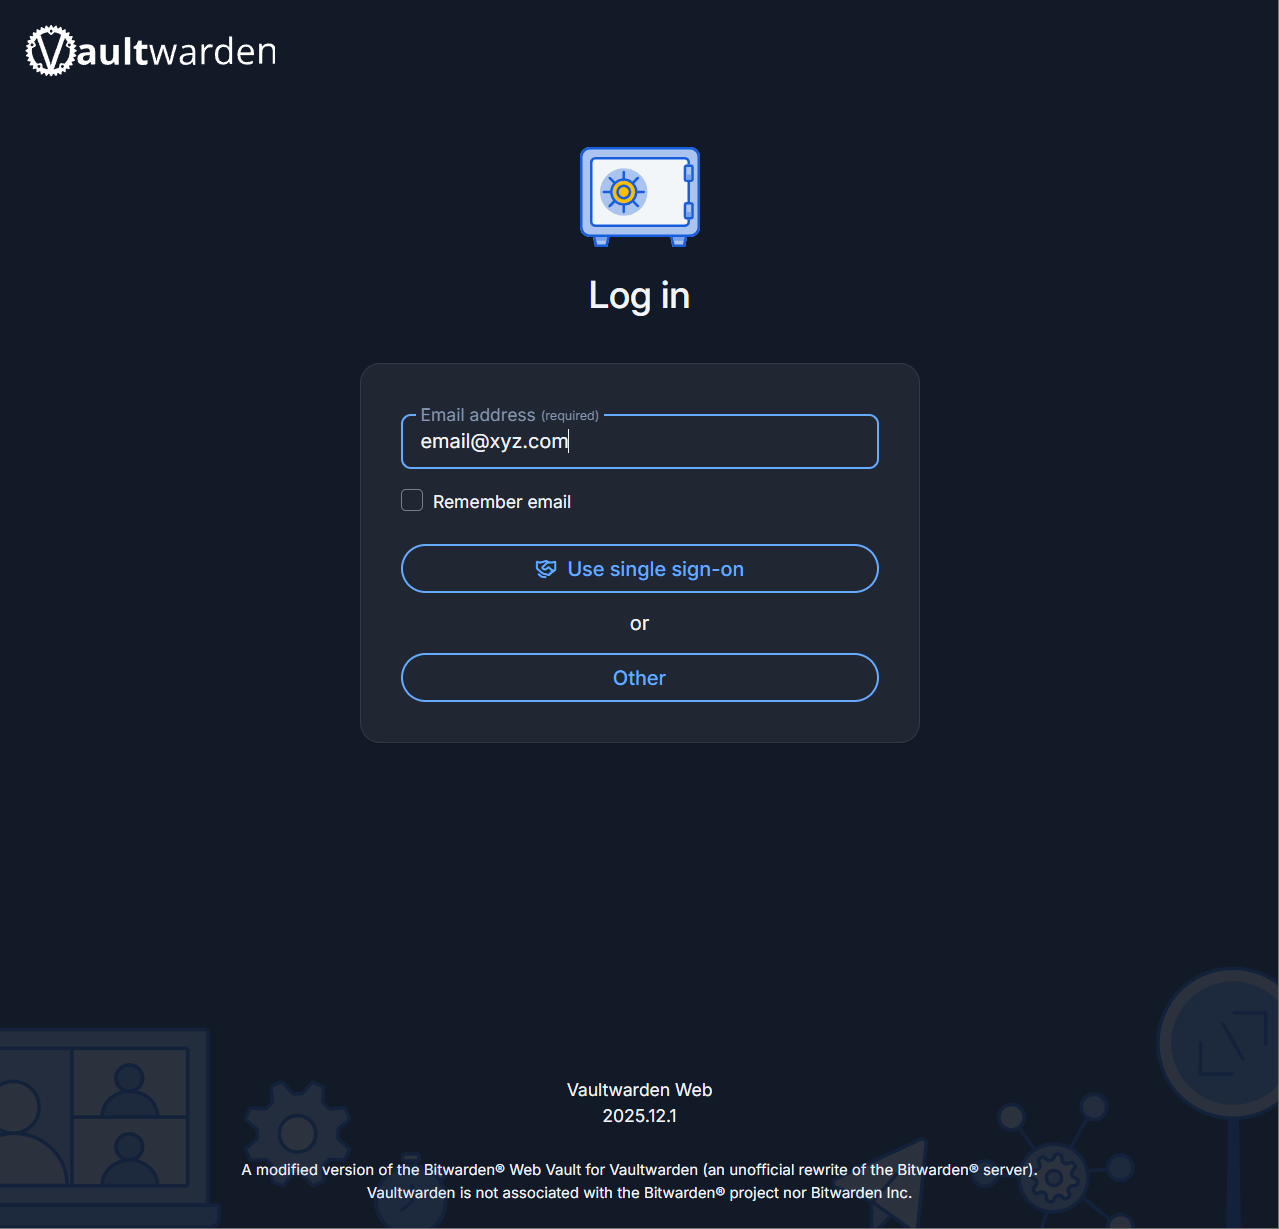
Step 2
You'll be presented with a log-in page. Fill in the email address with any address (it does not matter what it is as along as it follows the format email@xyz.com)
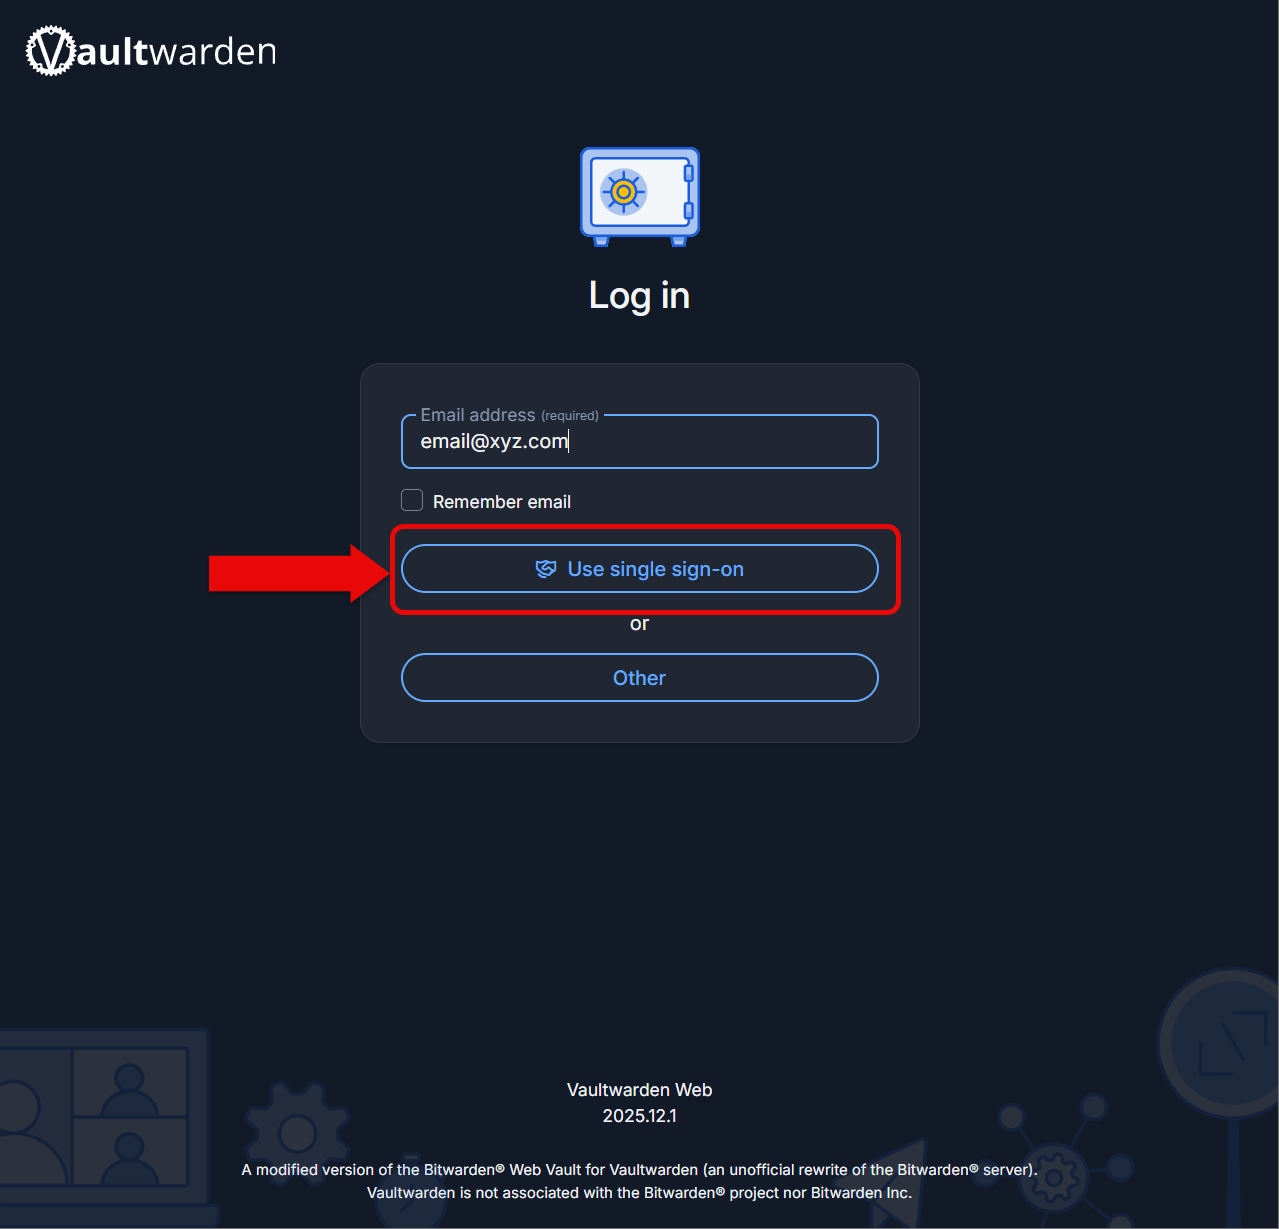
Step 3
Click on Use single sign-on to log create your account.
Step 4
Log into the authentication like normal. You will be redirected back to Bitwarden shortly.
Step 5
Next, enter a master password that you'll need to type in every time you log into the manager. This is for security purposes.
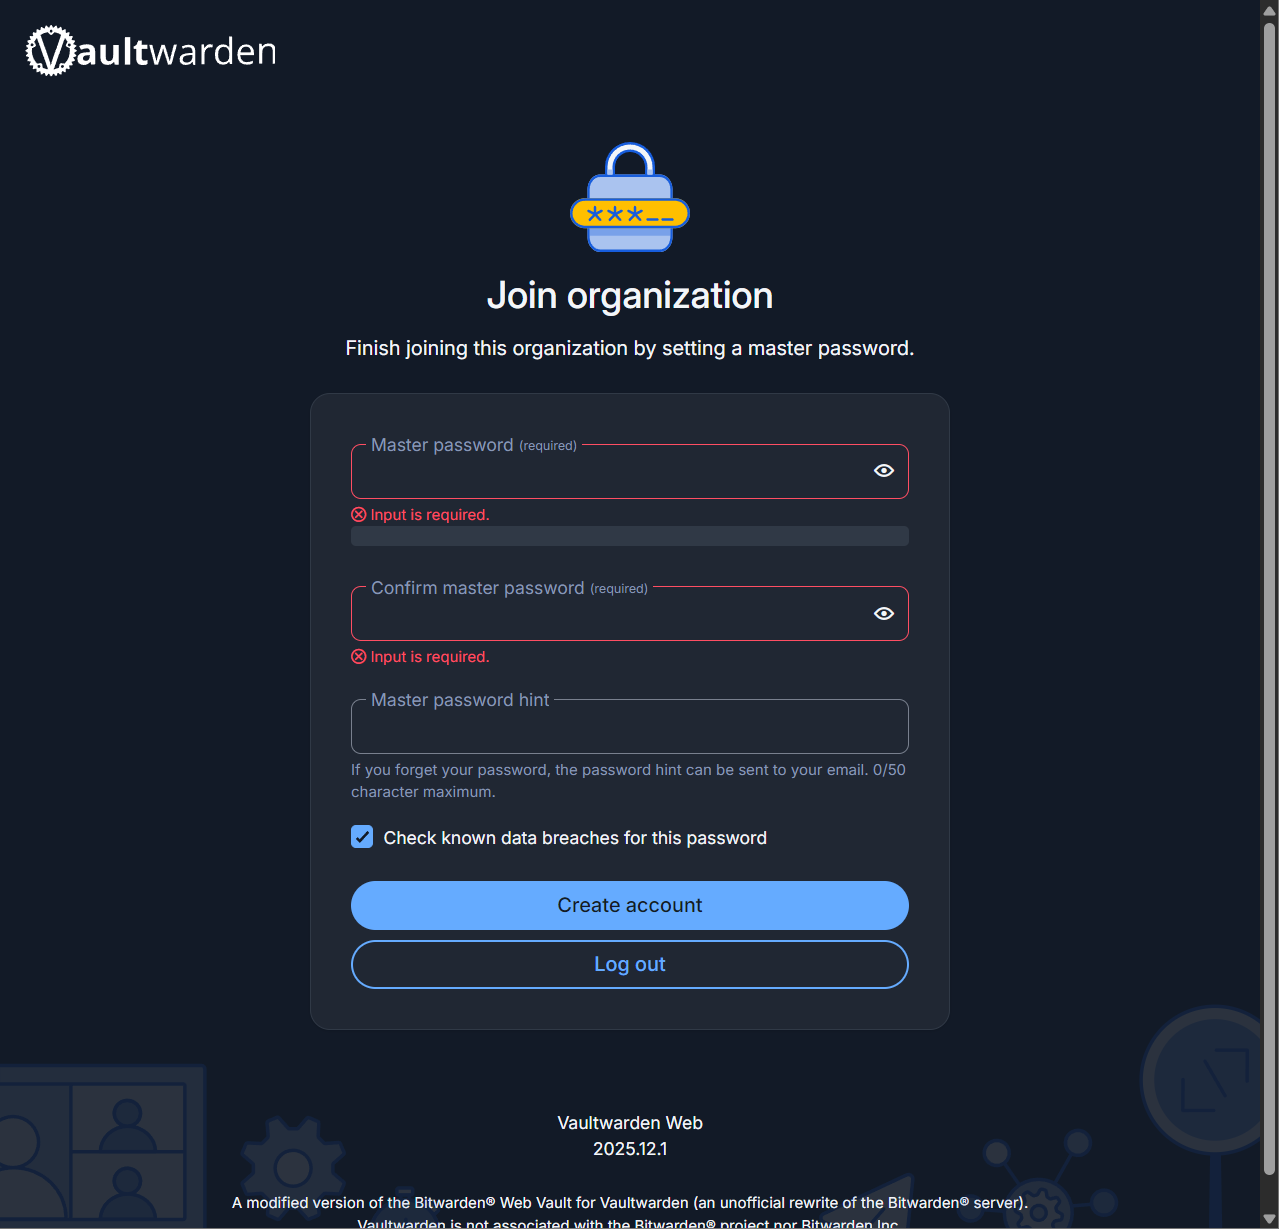
Step 6
Click create account to finish the process.
Step 7
If you plan on using the extension inside the browser, go ahead and click on the button to go to the download page.
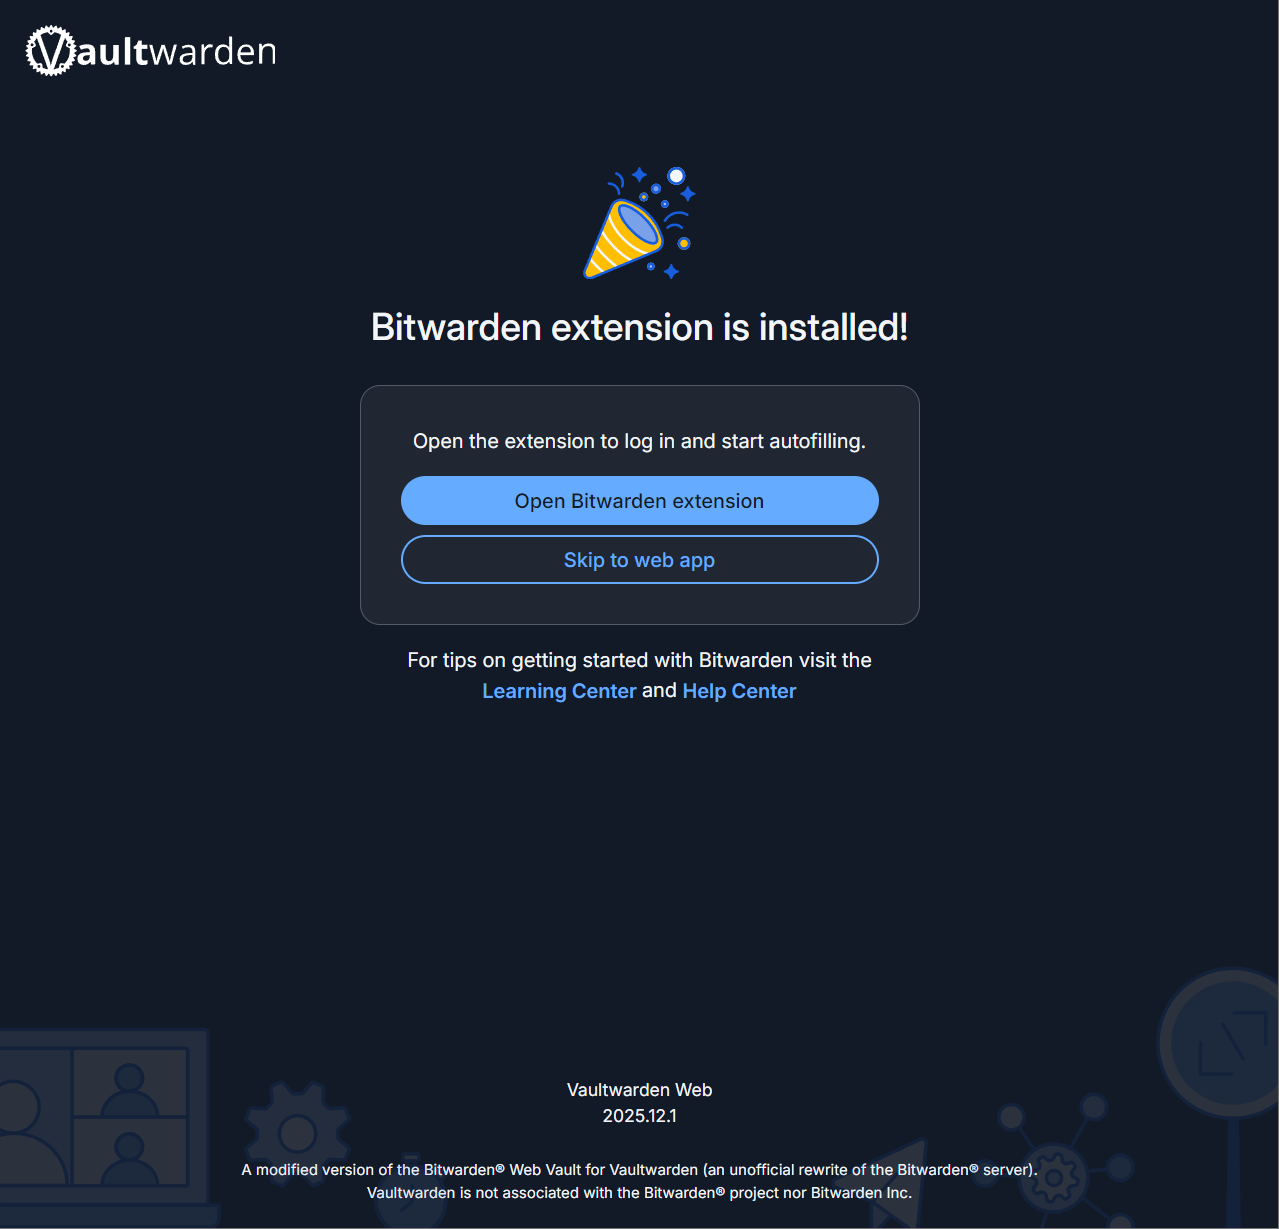
Step 8
Go ahead and click skip to web app when/if you've finished installing the extension.
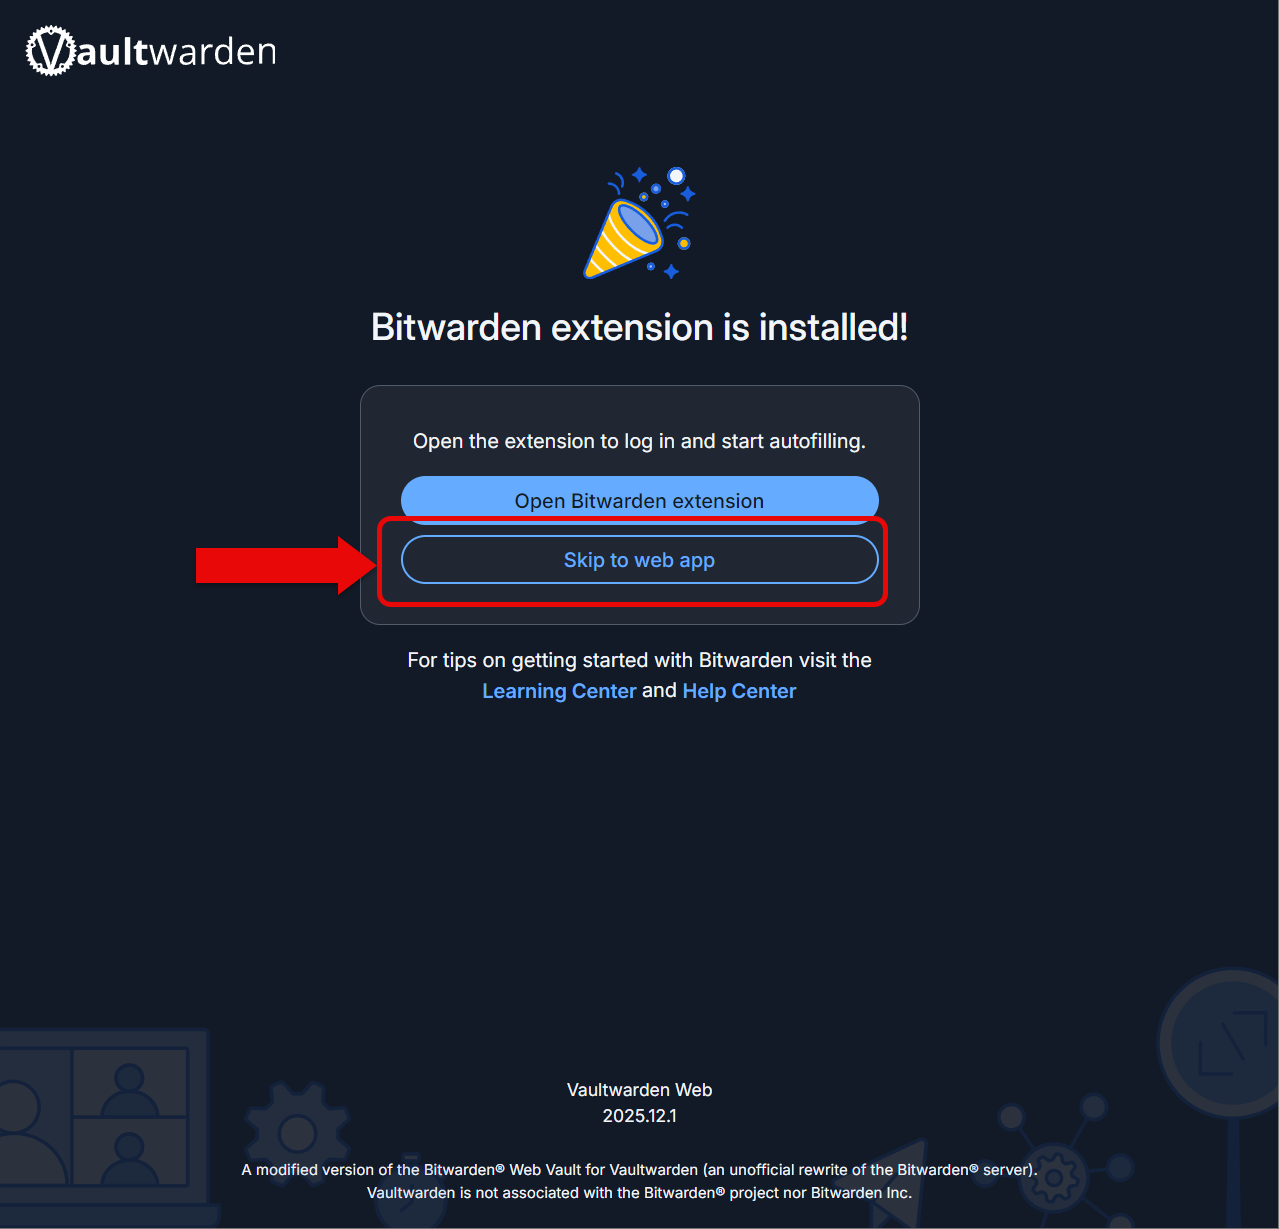
Step 9
Go ahead and let the administrator know you'd like to be added to the organization. Once that's happened, you'd need to learn how to use Bitwarden.