# Get Started with the Mobile Apps

Get Started

Bitwarden mobile apps let you take your password manager on the go. Download Bitwarden from the [iOS App ](https://bitwarden.com/download/apple-iphone-password-manager/)Store or Google Play Store, or by navigating to [get.bitwarden.com](https://get.bitwarden.com/) on any device.
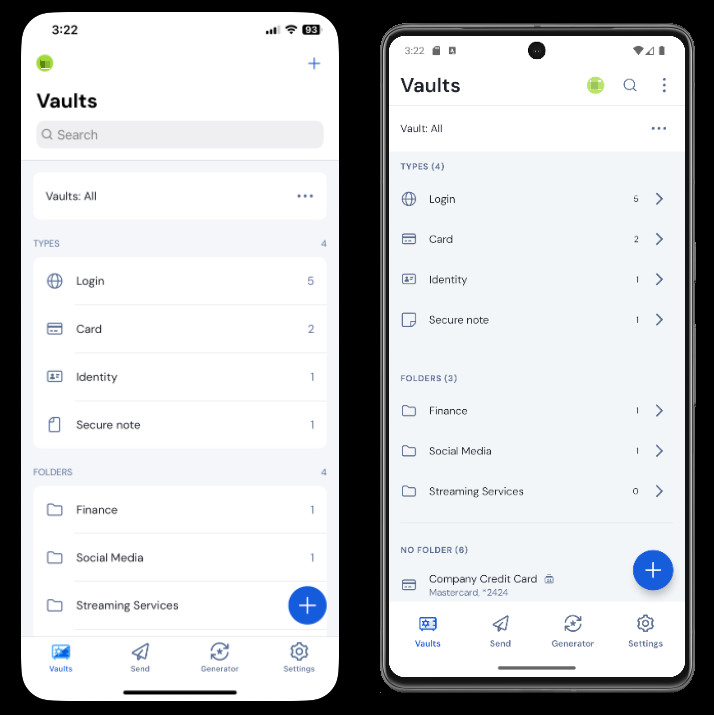
<figure class="mb-10 print:[break-inside:avoid]" id="bkmrk-bitwarden-on-ios-and"><div class=""><div class="relative overflow-hidden block max-w-full"><picture><source media="(max-width:400px)" srcset="https://bitwarden.com/assets/53OzJZ4klYWemxUepHMtq4/5ab47331f033259bd2e82817a99e992f/2025-01-21_15-22-10.png?w=400&fm=avif" type="image/avif"><source media="(max-width:800px)" srcset="https://bitwarden.com/assets/53OzJZ4klYWemxUepHMtq4/5ab47331f033259bd2e82817a99e992f/2025-01-21_15-22-10.png?w=800&fm=avif" type="image/avif"><source media="(min-width:801px)" srcset="https://bitwarden.com/assets/53OzJZ4klYWemxUepHMtq4/5ab47331f033259bd2e82817a99e992f/2025-01-21_15-22-10.png?w=714&fm=avif" type="image/avif">![Bitwarden on iOS and Android](https://bitwarden.com/assets/53OzJZ4klYWemxUepHMtq4/5ab47331f033259bd2e82817a99e992f/2025-01-21_15-22-10.png?w=714&fm=jpg)</source></source></source></picture></div></div><figcaption class="w-fit max-w-sm mx-auto text-center text-xs text-secondary-600 dark:text-secondary-300 mt-2 print:mt-1"><cite>Bitwarden on iOS and Android</cite></figcaption></figure>## First steps

<div class="scrollspy group inline-block w-full relative" id="bkmrk-"></div>Let's start your Bitwarden mobile journey by adding a new login item to your vault and make sure it's secure and easy to find:

### Create a folder

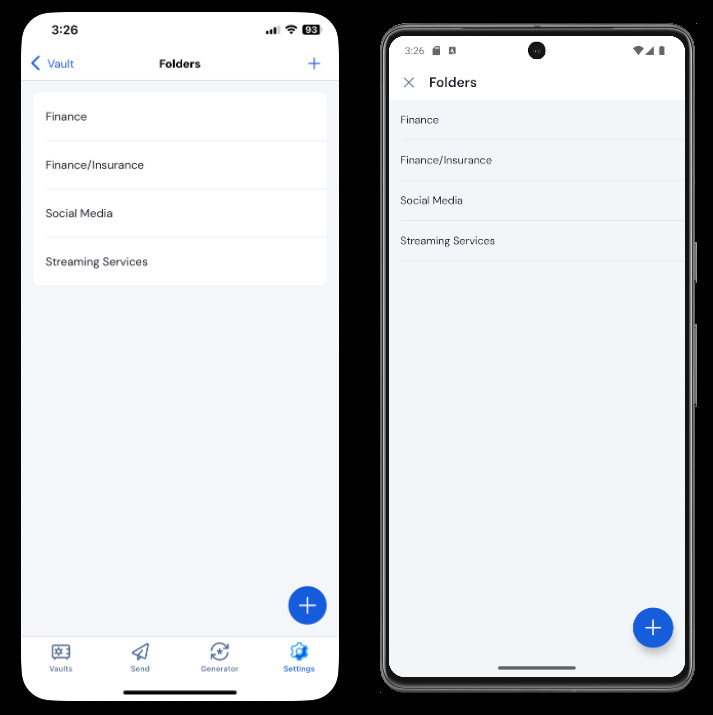
<div class="scrollspy group inline-block w-full relative" id="bkmrk--1"></div>Folders are a great way to make sure you can always find vault items when you need to use them. To create a folder:

1. Select the **Settings** tab.
2. Select **Vault** and, in the settings list, tap **Folders**:
    
    <figure class="mb-10 print:[break-inside:avoid]"><div class=""><div class="relative overflow-hidden block max-w-full"><picture><source media="(max-width:400px)" srcset="https://bitwarden.com/assets/6IwzXSJHGmSeU7oIy4z8kZ/95620b58758e50fa0e8e22a65f2bfa15/2025-01-21_15-26-07.png?w=400&fm=avif" type="image/avif"><source media="(max-width:800px)" srcset="https://bitwarden.com/assets/6IwzXSJHGmSeU7oIy4z8kZ/95620b58758e50fa0e8e22a65f2bfa15/2025-01-21_15-26-07.png?w=800&fm=avif" type="image/avif"><source media="(min-width:801px)" srcset="https://bitwarden.com/assets/6IwzXSJHGmSeU7oIy4z8kZ/95620b58758e50fa0e8e22a65f2bfa15/2025-01-21_15-26-07.png?w=713&fm=avif" type="image/avif">![Folders on mobile](https://bitwarden.com/assets/6IwzXSJHGmSeU7oIy4z8kZ/95620b58758e50fa0e8e22a65f2bfa15/2025-01-21_15-26-07.png?w=713&fm=jpg)</source></source></source></picture></div></div><figcaption class="w-fit max-w-sm mx-auto text-center text-xs text-secondary-600 dark:text-secondary-300 mt-2 print:mt-1"><cite>Folders on mobile</cite></figcaption></figure>
3. Select the + **Add** icon.
4. Give your folder a name, (for example, `Social Media`), and select **Save.**

### Add a login

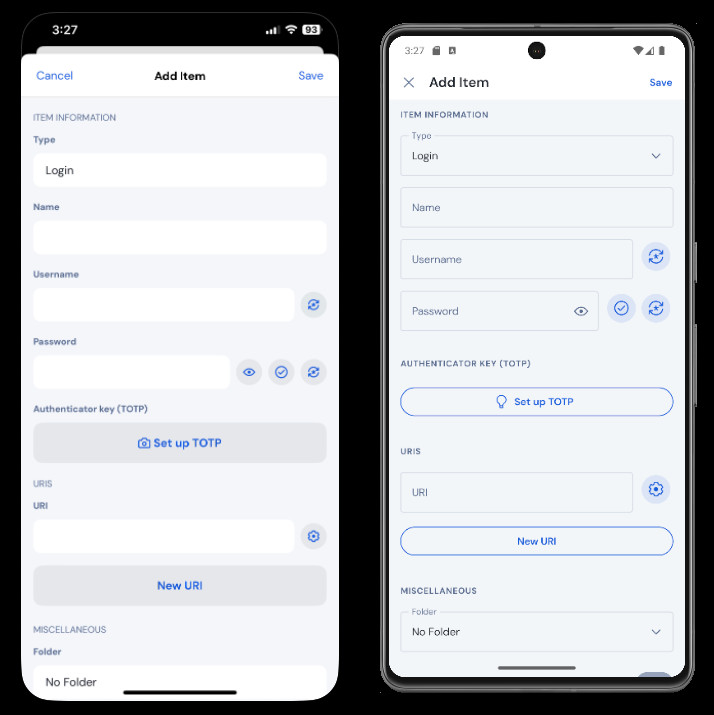
<div class="scrollspy group inline-block w-full relative" id="bkmrk--2"></div>Now, let's add a login to your new folder. To create a new login item:

1. Navigate to the **My Vault** tab and select the + **Add** icon.
2. Choose which type of item to create (in this case, select **Login**):
    
    <figure class="mb-10 print:[break-inside:avoid]"><div class=""><div class="relative overflow-hidden block max-w-full"><picture><source media="(max-width:400px)" srcset="https://bitwarden.com/assets/4QMufMJAsQn5qN9XY3syyL/decdef6cfc89e8af57c30e17ddeae864/2025-01-21_15-27-28.png?w=400&fm=avif" type="image/avif"><source media="(max-width:800px)" srcset="https://bitwarden.com/assets/4QMufMJAsQn5qN9XY3syyL/decdef6cfc89e8af57c30e17ddeae864/2025-01-21_15-27-28.png?w=800&fm=avif" type="image/avif"><source media="(min-width:801px)" srcset="https://bitwarden.com/assets/4QMufMJAsQn5qN9XY3syyL/decdef6cfc89e8af57c30e17ddeae864/2025-01-21_15-27-28.png?w=714&fm=avif" type="image/avif">![Add a login on mobile](https://bitwarden.com/assets/4QMufMJAsQn5qN9XY3syyL/decdef6cfc89e8af57c30e17ddeae864/2025-01-21_15-27-28.png?w=714&fm=jpg)</source></source></source></picture></div></div><figcaption class="w-fit max-w-sm mx-auto text-center text-xs text-secondary-600 dark:text-secondary-300 mt-2 print:mt-1"><cite>Add a login on mobile</cite></figcaption></figure>
3. Enter the basic information for this login. For now, give the item:
    
    
    1. A **Name** to help you easily recognize it (for example, `Instagram Account`).
    2. Your **Username**.
    3. Your current **Password** (we'll replace this with a strong one soon).
4. Select the **New URI** button and enter the URL where you log in to the account (for example, `https://www.instagram.com/accounts/login/`)
5. Select a folder from the **Folder** dropdown. If you are following our example, choose the Social Media folder you just created.
6. Nice work! Select **Save** to continue.

### Generate a strong password

<div class="scrollspy group inline-block w-full relative" id="bkmrk--3"></div>Now that you have saved a new login, let's improve its security by replacing your password with a stronger one:

1. Open a web browser or the mobile app for your account and login with your existing username and password. Once you are logged in, find the **Change your password** page.
2. On the **Change your password** page, enter your current password. You can copy and paste this from Bitwarden!
3. Back in Bitwarden, select the login item and tap **Edit** on iOS or the <span class="rich-icon" title="pencil"></span> on Android.
4. In the Password box, select <span class="rich-icon" title="generate"></span> **Generate** and confirm **Yes** to overwrite your old password.  
      
    This will replace your password with a randomly-generated strong password. Moving from `Fido1234` to `X@Ln@x9J@&u@5n##B` can stop a hacker.
5. Select **Save**.
6. Copy your new password and paste it into the **New Password** and **Confirm** **Password** fields back in the other app.

Congratulations! Your login is now saved in Bitwarden for secure and easy use!

### Add a second account

<div class="scrollspy group inline-block w-full relative" id="bkmrk--4"></div>Do you have multiple Bitwarden accounts, like one for personal use and one for work? The mobile app can be logged in to five accounts at once!

To login to a second account, select the currently logged-in account from the top menu bar of the app and select + **Add Account:**
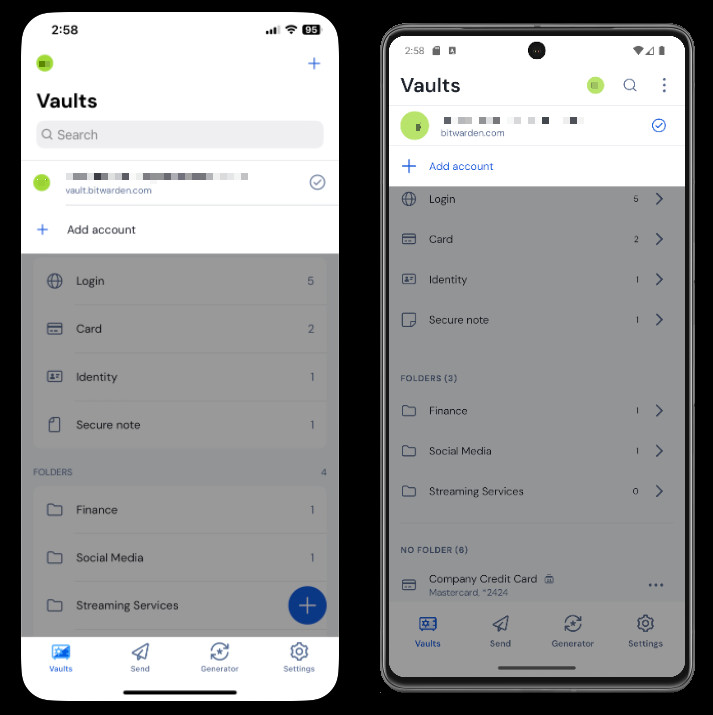
<figure class="mb-10 print:[break-inside:avoid]" id="bkmrk-account-switching-on"><div class=""><div class="relative overflow-hidden block max-w-full"><picture><source media="(max-width:400px)" srcset="https://bitwarden.com/assets/56xAZhiS6wZqKktMlFwbVn/9af5d0ce782af44fc48ebfd8057ddc4c/2025-01-21_14-58-15.png?w=400&fm=avif" type="image/avif"><source media="(max-width:800px)" srcset="https://bitwarden.com/assets/56xAZhiS6wZqKktMlFwbVn/9af5d0ce782af44fc48ebfd8057ddc4c/2025-01-21_14-58-15.png?w=800&fm=avif" type="image/avif"><source media="(min-width:801px)" srcset="https://bitwarden.com/assets/56xAZhiS6wZqKktMlFwbVn/9af5d0ce782af44fc48ebfd8057ddc4c/2025-01-21_14-58-15.png?w=713&fm=avif" type="image/avif">![Account switching on mobile](https://bitwarden.com/assets/56xAZhiS6wZqKktMlFwbVn/9af5d0ce782af44fc48ebfd8057ddc4c/2025-01-21_14-58-15.png?w=713&fm=jpg)</source></source></source></picture></div></div><figcaption class="w-fit max-w-sm mx-auto text-center text-xs text-secondary-600 dark:text-secondary-300 mt-2 print:mt-1"><cite>Account switching on mobile</cite></figcaption></figure>Once you log in to your second account, you can quickly switch between them from the same menu, which will also show the current status of each account's vault (locked or unlocked). If you log out of one of these accounts, it will be removed from this list.

## Next steps

<div class="scrollspy group inline-block w-full relative" id="bkmrk--5"></div>Now that you have mastered the basics, let's dig into some of the more powerful features of Bitwarden mobile apps:

<details id="bkmrk-ios-setup-autofill-s"><summary>iOS</summary>

### Setup AutoFill

<div class="scrollspy group inline-block w-full relative" id="bkmrk--6"></div>Setup AutoFill to automatically enter logins from your iOS device to a web browser (like Safari) or other app.

<div class="contents">1. On the iOS home screen, tap the **Settings** app.
2. From the Settings menu, tap **General** and then **AutoFill &amp; Passwords**.
3. Tap the **AutoFill Passwords** **and Passkeys** toggle. Green indicates that AutoFill is active.
4. In the **AutoFill From:** list, select the **Bitwarden** toggle. Green indicates that AutoFill is active.

</div>When you create new logins, make sure you enter a website in the [URI field](https://bitwarden.com/help/getting-started-mobile/#add-a-login) to surface them for AutoFill. For more information, see Autofill Logins on iOS.

### Launch from mobile apps

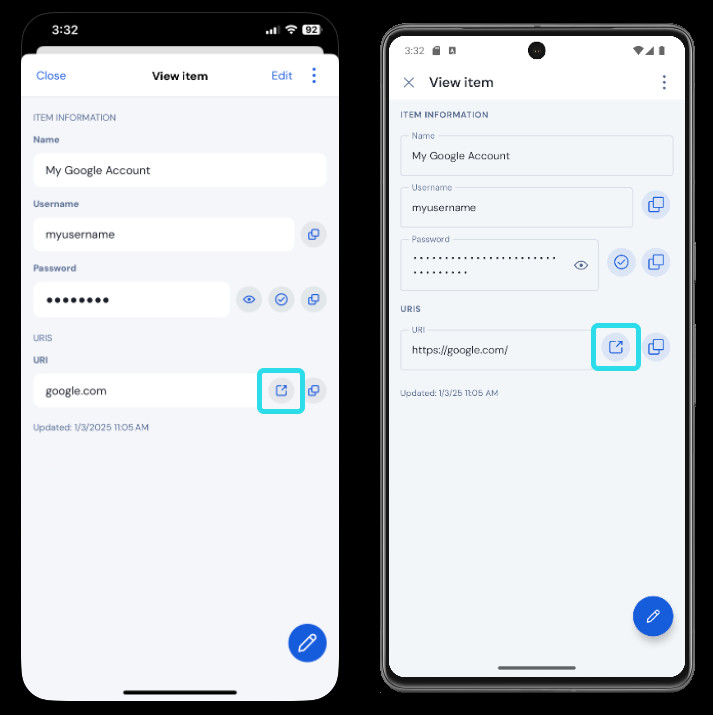
<div class="contents"><div class="scrollspy group inline-block w-full relative" id="bkmrk--7"></div></div>You can launch a website directly from Bitwarden by selecting the **Launch** button in any vault item with a valid URI. If you're unfamiliar with using URIs, see [Using URIs](https://bitwarden.com/help/uri-match-detection/).
<div class="contents"><figure class="mb-10 print:[break-inside:avoid]"><div class=""><div class="relative overflow-hidden block max-w-full"><picture><source media="(max-width:400px)" srcset="https://bitwarden.com/assets/2PsCaLjOAe6WEfnwMkYG0P/be1fde317404835cba1e600244922d98/2025-01-21_15-32-37.png?w=400&fm=avif" type="image/avif"><source media="(max-width:800px)" srcset="https://bitwarden.com/assets/2PsCaLjOAe6WEfnwMkYG0P/be1fde317404835cba1e600244922d98/2025-01-21_15-32-37.png?w=800&fm=avif" type="image/avif"><source media="(min-width:801px)" srcset="https://bitwarden.com/assets/2PsCaLjOAe6WEfnwMkYG0P/be1fde317404835cba1e600244922d98/2025-01-21_15-32-37.png?w=713&fm=avif" type="image/avif">![Launch from mobile](https://bitwarden.com/assets/2PsCaLjOAe6WEfnwMkYG0P/be1fde317404835cba1e600244922d98/2025-01-21_15-32-37.png?w=713&fm=jpg)</source></source></source></picture></div></div><figcaption class="w-fit max-w-sm mx-auto text-center text-xs text-secondary-600 dark:text-secondary-300 mt-2 print:mt-1"><cite>Launch from mobile</cite></figcaption></figure></div>### Unlock with biometrics

<div class="contents"><div class="scrollspy group inline-block w-full relative" id="bkmrk--8"></div></div>Unlocking Bitwarden with biometrics allows for seamless access to your vault. If you haven't setup Touch ID or Face ID on your iOS device, you'll need to do that first from the iOS **Settings** app.

<div class="contents">1. In your Bitwarden iOS app, tap the **Settings** tab located at the bottom of your screen.
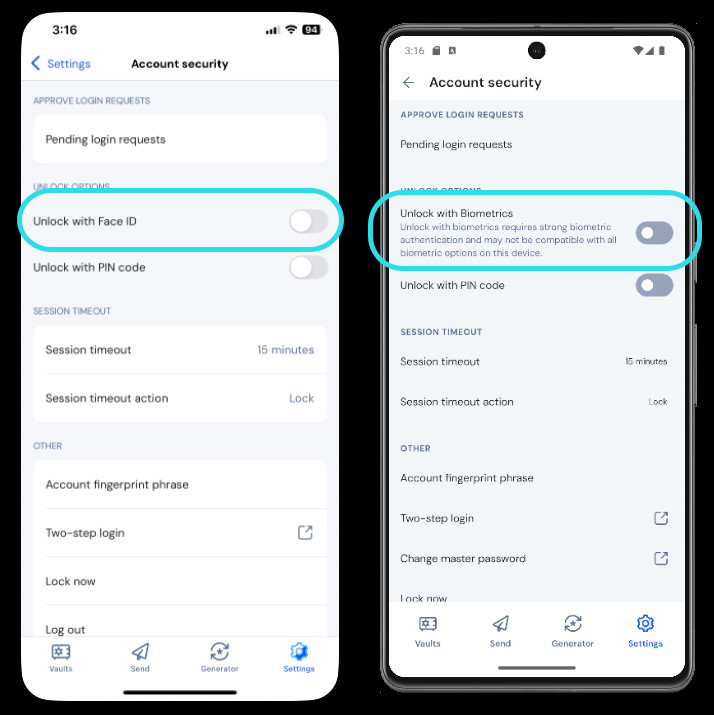
2. Tap **Account security**:
    
    <figure class="mb-10 print:[break-inside:avoid]"><div class=""><div class="relative overflow-hidden block max-w-full"><picture><source media="(max-width:400px)" srcset="https://bitwarden.com/assets/7FDRtrf7LkC22dzf3ErsR4/3c176fd1ddb2a3d188817d7e1f795adf/2025-01-21_15-16-44.png?w=400&fm=avif" type="image/avif"><source media="(max-width:800px)" srcset="https://bitwarden.com/assets/7FDRtrf7LkC22dzf3ErsR4/3c176fd1ddb2a3d188817d7e1f795adf/2025-01-21_15-16-44.png?w=800&fm=avif" type="image/avif"><source media="(min-width:801px)" srcset="https://bitwarden.com/assets/7FDRtrf7LkC22dzf3ErsR4/3c176fd1ddb2a3d188817d7e1f795adf/2025-01-21_15-16-44.png?w=714&fm=avif" type="image/avif">![Biometric unlock on mobile](https://bitwarden.com/assets/7FDRtrf7LkC22dzf3ErsR4/3c176fd1ddb2a3d188817d7e1f795adf/2025-01-21_15-16-44.png?w=714&fm=jpg)</source></source></source></picture></div></div><figcaption class="w-fit max-w-sm mx-auto text-center text-xs text-secondary-600 dark:text-secondary-300 mt-2 print:mt-1"><cite>Biometric unlock on mobile</cite></figcaption></figure>
3. Depending on what your device has available, tap:
    
    
    - **Unlock with Touch ID**
    - **Unlock with Face ID**
4. You will be asked to verify with your fingerprint or face depending on your selection. The toggle will fill to indicate that an option is active.

</div>Once enabled, you will be able to open Bitwarden or AutoFill logins using just your biometric method of choice.

### Login using AutoFill

<div class="contents"><div class="scrollspy group inline-block w-full relative" id="bkmrk--9"></div></div>Once you've setup [Auto-fill](https://bitwarden.com/help/getting-started-mobile/#setup-auto-fill) and [biometrics](https://bitwarden.com/help/getting-started-mobile/#unlock-with-biometrics), logging into an app or website using Bitwarden is simple.

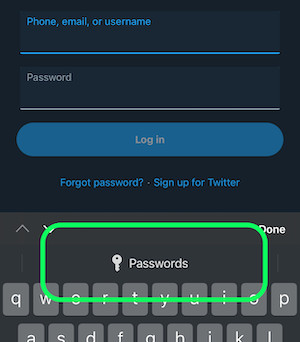
<div class="contents">1. Tap the email/username or password input box in the app or website.
2. Above your keyboard, tap **Passwords**.
    
    <figure class="mb-10 print:[break-inside:avoid]"><div class=""><div class="relative overflow-hidden block max-w-full"><picture><source media="(max-width:400px)" srcset="https://bitwarden.com/assets/4DNAawWIUOKKVUN0cMdqLI/6fd8e01e004fdefcb72b60380ff8ee64/autofill-ios.png?w=400&fm=avif" type="image/avif"><source media="(max-width:800px)" srcset="https://bitwarden.com/assets/4DNAawWIUOKKVUN0cMdqLI/6fd8e01e004fdefcb72b60380ff8ee64/autofill-ios.png?w=800&fm=avif" type="image/avif"><source media="(min-width:801px)" srcset="https://bitwarden.com/assets/4DNAawWIUOKKVUN0cMdqLI/6fd8e01e004fdefcb72b60380ff8ee64/autofill-ios.png?w=300&fm=avif" type="image/avif">![Tap Passwords in iOS](https://bitwarden.com/assets/4DNAawWIUOKKVUN0cMdqLI/6fd8e01e004fdefcb72b60380ff8ee64/autofill-ios.png?w=300&fm=jpg)</source></source></source></picture></div></div><figcaption class="w-fit max-w-sm mx-auto text-center text-xs text-secondary-600 dark:text-secondary-300 mt-2 print:mt-1"><cite>Tap Passwords in iOS</cite></figcaption></figure>
3. You will be prompted for your Face ID or Touch ID. If you aren't using [biometrics](https://bitwarden.com/help/getting-started-mobile/#unlock-with-biometrics), enter your master password.
4. If you have connected a login to this website or app using the [URI field](https://bitwarden.com/help/getting-started-mobile/#create-items), that login will appear in this window. If you haven't, tap **Search** to find it. Tap the login to automatically enter your email/username and password into the boxes, and sign in.

</div></details><details id="bkmrk-android-setup-autofi"><summary>Android</summary>

### Setup autofill

<div class="mb-16"><div><div aria-hidden="false" aria-labelledby="tab-tab-android-4S5U2PhxvDwkLQJPaIvbfA" class="tab-panel p-6 bg-secondary-50 border-2 border-secondary-200 rounded-sm rounded-tl-none dark:bg-secondary-800 dark:border-none block" role="tabpanel"><div class="contents"><div class="scrollspy group inline-block w-full relative" id="bkmrk--10"></div></div><div class="contents">  
</div></div></div></div>Setup auto-fill to automatically enter logins from your Android device to a web browser (such as Chrome) or other app. To enable autofill:

<div class="mb-16"><div><div aria-hidden="false" aria-labelledby="tab-tab-android-4S5U2PhxvDwkLQJPaIvbfA" class="tab-panel p-6 bg-secondary-50 border-2 border-secondary-200 rounded-sm rounded-tl-none dark:bg-secondary-800 dark:border-none block" role="tabpanel"><div class="contents">  
</div><div class="contents">1. Open your Bitwarden Android app and tap the **Settings** tab.
2. Tap the **Autofill** option:
    
    <figure class="mb-10 print:[break-inside:avoid]"><div class=""><div class="relative overflow-hidden block max-w-full"><picture><source media="(max-width:400px)" srcset="https://bitwarden.com/assets/5Othw4YuSWmQbV1pmkvVxd/1d8fcf282bee1d729abe88570e7e650f/2025-01-21_15-29-52.png?w=400&fm=avif" type="image/avif"><source media="(max-width:800px)" srcset="https://bitwarden.com/assets/5Othw4YuSWmQbV1pmkvVxd/1d8fcf282bee1d729abe88570e7e650f/2025-01-21_15-29-52.png?w=800&fm=avif" type="image/avif"><source media="(min-width:801px)" srcset="https://bitwarden.com/assets/5Othw4YuSWmQbV1pmkvVxd/1d8fcf282bee1d729abe88570e7e650f/2025-01-21_15-29-52.png?w=346&fm=avif" type="image/avif">![Android autofill options](https://bitwarden.com/assets/5Othw4YuSWmQbV1pmkvVxd/1d8fcf282bee1d729abe88570e7e650f/2025-01-21_15-29-52.png?w=346&fm=jpg)</source></source></source></picture></div></div><figcaption class="w-fit max-w-sm mx-auto text-center text-xs text-secondary-600 dark:text-secondary-300 mt-2 print:mt-1"><cite>Android autofill options</cite></figcaption></figure>
3. Toggle the **Autofill Services** option. You'll be automatically redirected to an Android Settings screen.
4. From the Autofill Services list, tap **Bitwarden**.

</div><div class="contents">  
</div></div></div></div>You'll be prompted to confirm you trust Bitwarden. Tapping **OK** will let Bitwarden read content on the screen to know when to offer autofill. For more information, see [Autofill logins on Android](https://bitwarden.com/help/auto-fill-android/).

### Launch from mobile apps

<div class="mb-16"><div><div aria-hidden="false" aria-labelledby="tab-tab-android-4S5U2PhxvDwkLQJPaIvbfA" class="tab-panel p-6 bg-secondary-50 border-2 border-secondary-200 rounded-sm rounded-tl-none dark:bg-secondary-800 dark:border-none block" role="tabpanel"><div class="contents"><div class="scrollspy group inline-block w-full relative" id="bkmrk--11"></div></div><div class="contents">  
</div></div></div></div>You can launch a website directly from Bitwarden by selecting the **Launch** button in any vault item with a valid URI. If you are unfamiliar with using URIs, see [Using URIs](https://bitwarden.com/help/uri-match-detection/).

<div class="mb-16"><div><div aria-hidden="false" aria-labelledby="tab-tab-android-4S5U2PhxvDwkLQJPaIvbfA" class="tab-panel p-6 bg-secondary-50 border-2 border-secondary-200 rounded-sm rounded-tl-none dark:bg-secondary-800 dark:border-none block" role="tabpanel"><div class="contents"></div><div class="contents"><figure class="mb-10 print:[break-inside:avoid]"><div class=""><div class="relative overflow-hidden block max-w-full"><picture><source media="(max-width:400px)" srcset="https://bitwarden.com/assets/2PsCaLjOAe6WEfnwMkYG0P/be1fde317404835cba1e600244922d98/2025-01-21_15-32-37.png?w=400&fm=avif" type="image/avif"><source media="(max-width:800px)" srcset="https://bitwarden.com/assets/2PsCaLjOAe6WEfnwMkYG0P/be1fde317404835cba1e600244922d98/2025-01-21_15-32-37.png?w=800&fm=avif" type="image/avif"><source media="(min-width:801px)" srcset="https://bitwarden.com/assets/2PsCaLjOAe6WEfnwMkYG0P/be1fde317404835cba1e600244922d98/2025-01-21_15-32-37.png?w=713&fm=avif" type="image/avif">![Launch from mobile](https://bitwarden.com/assets/2PsCaLjOAe6WEfnwMkYG0P/be1fde317404835cba1e600244922d98/2025-01-21_15-32-37.png?w=713&fm=jpg)</source></source></source></picture></div></div><figcaption class="w-fit max-w-sm mx-auto text-center text-xs text-secondary-600 dark:text-secondary-300 mt-2 print:mt-1"><cite>Launch from mobile</cite></figcaption></figure></div></div></div></div>### Unlock with biometrics

Unlocking Bitwarden with biometrics allows for seamless access to your vault. If you haven't setup [fingerprint unlock](https://support.google.com/nexus/answer/6285273?hl=en) or [face unlock](https://support.google.com/pixelphone/answer/9517039?hl=en) on your Android device, you will need to do that first from the Android **Settings** app.

<div class="mb-16"><div><div aria-hidden="false" aria-labelledby="tab-tab-android-4S5U2PhxvDwkLQJPaIvbfA" class="tab-panel p-6 bg-secondary-50 border-2 border-secondary-200 rounded-sm rounded-tl-none dark:bg-secondary-800 dark:border-none block" role="tabpanel"><div class="contents">1. In Bitwarden, tap the **Settings** tab located at the bottom of your screen.
2. Tap **Account security**.
3. Tap **Unlock with biometrics**:

    
    <figure class="mb-10 print:[break-inside:avoid]"><div class=""><div class="relative overflow-hidden block max-w-full"><picture><source media="(max-width:400px)" srcset="https://bitwarden.com/assets/7FDRtrf7LkC22dzf3ErsR4/3c176fd1ddb2a3d188817d7e1f795adf/2025-01-21_15-16-44.png?w=400&fm=avif" type="image/avif"><source media="(max-width:800px)" srcset="https://bitwarden.com/assets/7FDRtrf7LkC22dzf3ErsR4/3c176fd1ddb2a3d188817d7e1f795adf/2025-01-21_15-16-44.png?w=800&fm=avif" type="image/avif"><source media="(min-width:801px)" srcset="https://bitwarden.com/assets/7FDRtrf7LkC22dzf3ErsR4/3c176fd1ddb2a3d188817d7e1f795adf/2025-01-21_15-16-44.png?w=714&fm=avif" type="image/avif">![Biometric unlock on mobile](https://bitwarden.com/assets/7FDRtrf7LkC22dzf3ErsR4/3c176fd1ddb2a3d188817d7e1f795adf/2025-01-21_15-16-44.png?w=714&fm=jpg)</source></source></source></picture></div></div><figcaption class="w-fit max-w-sm mx-auto text-center text-xs text-secondary-600 dark:text-secondary-300 mt-2 print:mt-1"><cite>Biometric unlock on mobile</cite></figcaption></figure>
4. You will be asked to verify with your fingerprint or face depending on your selection.

</div><div class="contents">  
</div></div></div></div>Once enabled, you will be able to open Bitwarden or autofill logins using just your biometric method of choice.

### Login using autofill

Once you have setup [autofill](https://bitwarden.com/help/getting-started-mobile/#setup-auto-fill) and biometrics, logging into an app or website using Bitwarden is simple.

<div class="mb-16"><div id="bkmrk-tap-the-email%2Fuserna"><div aria-hidden="false" aria-labelledby="tab-tab-android-4S5U2PhxvDwkLQJPaIvbfA" class="tab-panel p-6 bg-secondary-50 border-2 border-secondary-200 rounded-sm rounded-tl-none dark:bg-secondary-800 dark:border-none block" id="bkmrk-tap-the-email%2Fuserna-1" role="tabpanel"><div class="contents">1. Tap the email/username or password input box in the app or website.
2. Depending on which auto-fill option your device uses, tap the available overlay:
    
    <figure class="mb-10 print:[break-inside:avoid]"><div class=""><div class="relative overflow-hidden block max-w-full"><picture><source media="(max-width:400px)" srcset="https://bitwarden.com/assets/3xbRUA76m4qpEyQ1b7msLo/b294ddfaae21f0e24d5e923266092df0/autofill-android-2.png?w=400&fm=avif" type="image/avif"><source media="(max-width:800px)" srcset="https://bitwarden.com/assets/3xbRUA76m4qpEyQ1b7msLo/b294ddfaae21f0e24d5e923266092df0/autofill-android-2.png?w=800&fm=avif" type="image/avif"><source media="(min-width:801px)" srcset="https://bitwarden.com/assets/3xbRUA76m4qpEyQ1b7msLo/b294ddfaae21f0e24d5e923266092df0/autofill-android-2.png?w=555&fm=avif" type="image/avif">![Android Auto-fill varieties ](https://bitwarden.com/assets/3xbRUA76m4qpEyQ1b7msLo/b294ddfaae21f0e24d5e923266092df0/autofill-android-2.png?w=555&fm=jpg)</source></source></source></picture></div></div><figcaption class="w-fit max-w-sm mx-auto text-center text-xs text-secondary-600 dark:text-secondary-300 mt-2 print:mt-1"><cite>Android Auto-fill varieties</cite></figcaption></figure>
3. You will be prompted for your face authentication or fingerprint. If you aren't using
    
    <div class="contents">[biometrics](https://bitwarden.com/help/getting-started-mobile/#unlock-with-biometrics), enter your master password.</div>
4. If you have connected a login to this website or app using the
    
    <div class="contents">[URI field](https://bitwarden.com/help/getting-started-mobile/#create-items), that login will appear in this window. If you haven't, tap **Search** to find it.</div>Tap the login to automatically enter your email/username and password into the boxes, and sign in.

</div></div></div></div></details>